Quick Answer
Emergency roof tarping typically costs $150 to $3,300, with many smaller jobs near $450 — labor, safety gear, and dispatch drive most of the cost, not the tarp itself. Tarp within the 24-to-48-hour drying window to prevent mold, but never in active wind or rain. Photograph the damage before and after and keep receipts for insurance reimbursement.
Key takeaways
- Emergency roof tarping typically costs $150 to $3,300, with many smaller jobs landing near $450 — labor, safety gear, and dispatch overhead drive most of the invoice, not the tarp material itself.
- The U.S. EPA, CDC, and FEMA all converge on a 24 to 48 hour drying window: wet materials dried inside that window usually don't grow mold; wet materials that sit beyond it usually do.
- OSHA explicitly warns against tarping in active wind or rain — falls are a leading cause of construction fatalities, and a storm-damaged roof is a worst-case fall environment.
- Florida, North Carolina, and South Carolina insurance departments all explicitly tell homeowners to make essential temporary repairs like tarping, photograph the damage before and after, and keep every receipt for reimbursement.
- After a presidential disaster declaration, FEMA's Operation Blue Roof can install free fiber-reinforced sheeting on qualifying primary residences — when the program is not active, paid emergency tarping remains the fastest option.
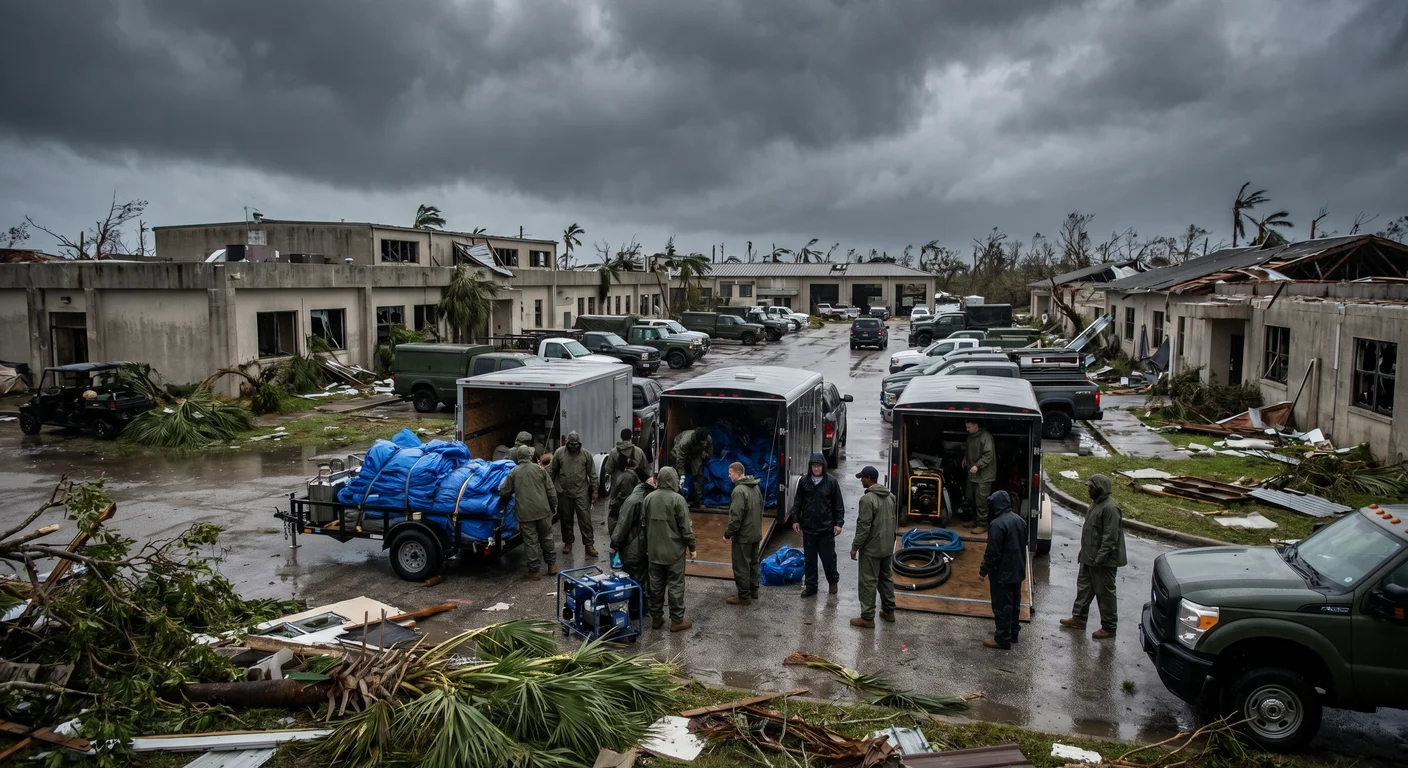
If your roof took a hit from a windstorm, hurricane, or severe thunderstorm in Florida, North Carolina, or South Carolina, the single most important next step is stopping water from entering the breach — fast, safely, and on the record. Emergency roof tarping typically costs $150 to $3,300 (with many smaller jobs landing near $450), and same-day or steep-roof calls run higher. Done correctly, a tarp turns a runaway loss into a documented mitigation step your carrier expects to reimburse. Done wrong — or skipped while you wait for an adjuster — and you can convert a clean storm claim into a mold claim that hits a sublimit. This guide walks the cost, the timeline, the safety rules, and the FL/NC/SC documentation specifics. Before you tarp, spot the storm damage on your roof first so the photo set captures cause and scope before the cover goes up. For the broader pillar, see our storm and hurricane damage restoration overview.
National cost range
$150–$3,300
HomeAdvisor and Angi residential project ranges
Average smaller job
~$450
Common cost-guide central tendency for straightforward access
EPA / CDC mold window
24–48 hrs
Wet materials must be dried inside this window to prevent mold growth
Emergency-call premium
~30%
Industry directional figure vs. scheduled tarping — varies by call timing
How Much Emergency Roof Tarping Costs
Emergency roof tarping is priced like a hazardous, time-sensitive repair — the labor and safety overhead make up the bulk of any quote, not the tarp material itself. A heavy-duty 10x12-foot blue tarp costs less than $50 at retail; the rest of your invoice is the trained crew, the 30-foot ladder, the harnesses and anchors, the fall-protection kit, the battens and ring-shank fasteners, and the dispatch overhead of getting a team to your property within hours of a storm event. Triangulating across HomeAdvisor, Angi, and several roofing-industry guides produces a clear residential range and a per-square-foot scaling factor that hold across Florida, North Carolina, and South Carolina.
| Cost item | Typical range | What changes the price |
|---|---|---|
| Total project cost (residential) | $150 – $3,300 | Roof size, slope, height, and damage area drive most variance |
| Average smaller-job cost | ~$450 | Single opening, one-story, straightforward access |
| Roofer labor rate | $45 – $75 / hour | Market-dependent, plus overhead and safety requirements |
| Labor cost component | $0.60 – $2.50 / sq ft | The dominant share of any tarping invoice |
| Tarp material only | $0.10 – $0.30 / sq ft | Thickness and quality matter; materials are not the main driver |
| Emergency-call band | $400 – $1,500 | Frequently cited "emergency crew" range for fast response |
| Per-sq-ft emergency estimate | $1.00 – $2.80 / sq ft | Used to scale quotes by damaged-area size |
Emergency roof tarping cost benchmarks (national, residential)
Four variables move your number up or down: the size of the damaged area you need to cover, the pitch of the roof (a steep gable demands harnesses and slow movement), the height (anything over 8 to 10 feet requires fall protection), and the urgency of the call. After a named storm, every roofer in the region is booked, and the price reflects that demand. Insurance carriers know these dynamics — which is why they expect documented receipts for emergency tarping, not eyeballed estimates.
Emergency vs. scheduled tarping
Industry guidance places the emergency premium around 30% above scheduled tarping. Treat that figure as directional, not universal — the actual gap depends on whether the call is overnight or weekend, how far the crew has to drive, and whether the storm has triggered a regional dispatch surge. The premium pays for the speed of arrival and the safety overhead of working off-hours, not for the tarp itself. If your damage is contained, the weather window is stable, and you have already started interior containment with drop cloths, scheduling tarping for the next business day can save several hundred dollars without raising your loss exposure. If water is actively entering and the EPA's 24–48 hour clock is ticking, paying the premium is almost always cheaper than the mold remediation that follows a delayed tarp.
When You Need Emergency Tarping (and Why Speed Matters)
Storm damage is rarely just a roof problem. A roof opening becomes an interior water problem in hours, and an interior water problem becomes a mold problem in days. The trigger for emergency tarping is any breach in the roof envelope that lets wind-driven rain in — missing or lifted shingles, displaced ridge cap, torn flashing around chimneys or vent pipes, a puncture from a fallen branch, or hail damage that has compromised the underlayment. If you can see daylight from the attic, water can get in, and the mold meter is already running.

- Missing or torn-loose shingles, including ridge cap and hip cap
- Lifted flashing around chimneys, skylights, or roof penetrations
- Punctures from fallen branches, satellite dishes, or wind-blown debris
- Hail bruising that has compromised the underlayment
- Soffit, fascia, or gutter damage that lets water track behind the wall
- Visible daylight from the attic during a daytime inspection
- Active interior dripping or fresh water staining on ceilings
Step 1 — Make the Site Safe and Stop Interior Water
Before anyone climbs onto a damaged roof, the storm has to be off the property. The Occupational Safety and Health Administration explicitly warns against tarping during active wind or rain, and Lowe's, GAF, and major restoration references repeat the same rule. If the weather window is closed, the priority is interior containment — buckets under active drips, plastic sheeting over electronics and furniture, and power killed at the breaker for any wet zone before water reaches an outlet.
- Place buckets and drop cloths under every active drip; rotate them as they fill
- Move salvageable furniture, art, and electronics out of the wet zone
- Kill power at the breaker for any room where water has reached fixtures or outlets
- Lift wet rugs and carpet pad off the floor; cut and remove if saturated
- Open interior doors and run fans on dry zones to start moisture circulation
- Photograph each interior step before and after with a visible timestamp
- Keep every receipt — buckets, sheeting, fans, plywood, hotel nights if displaced
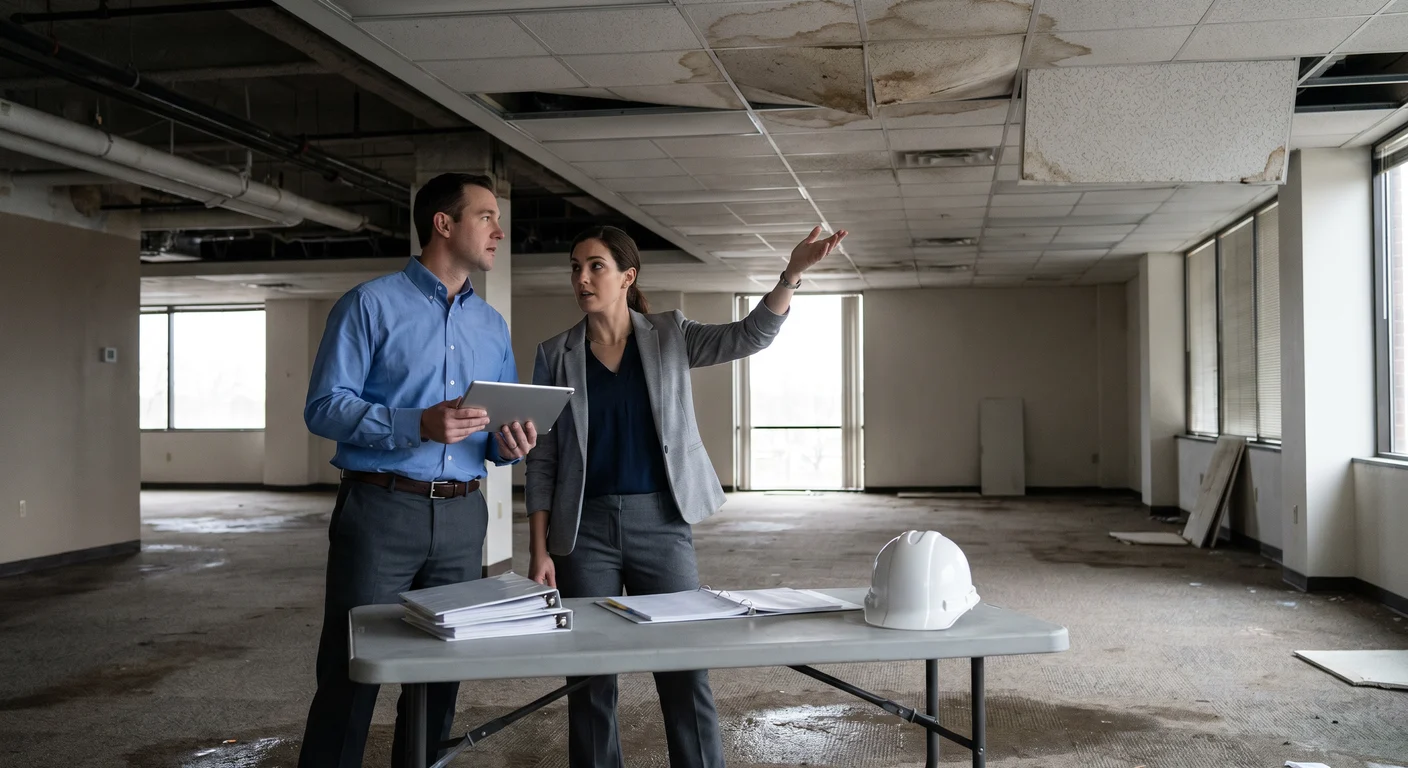
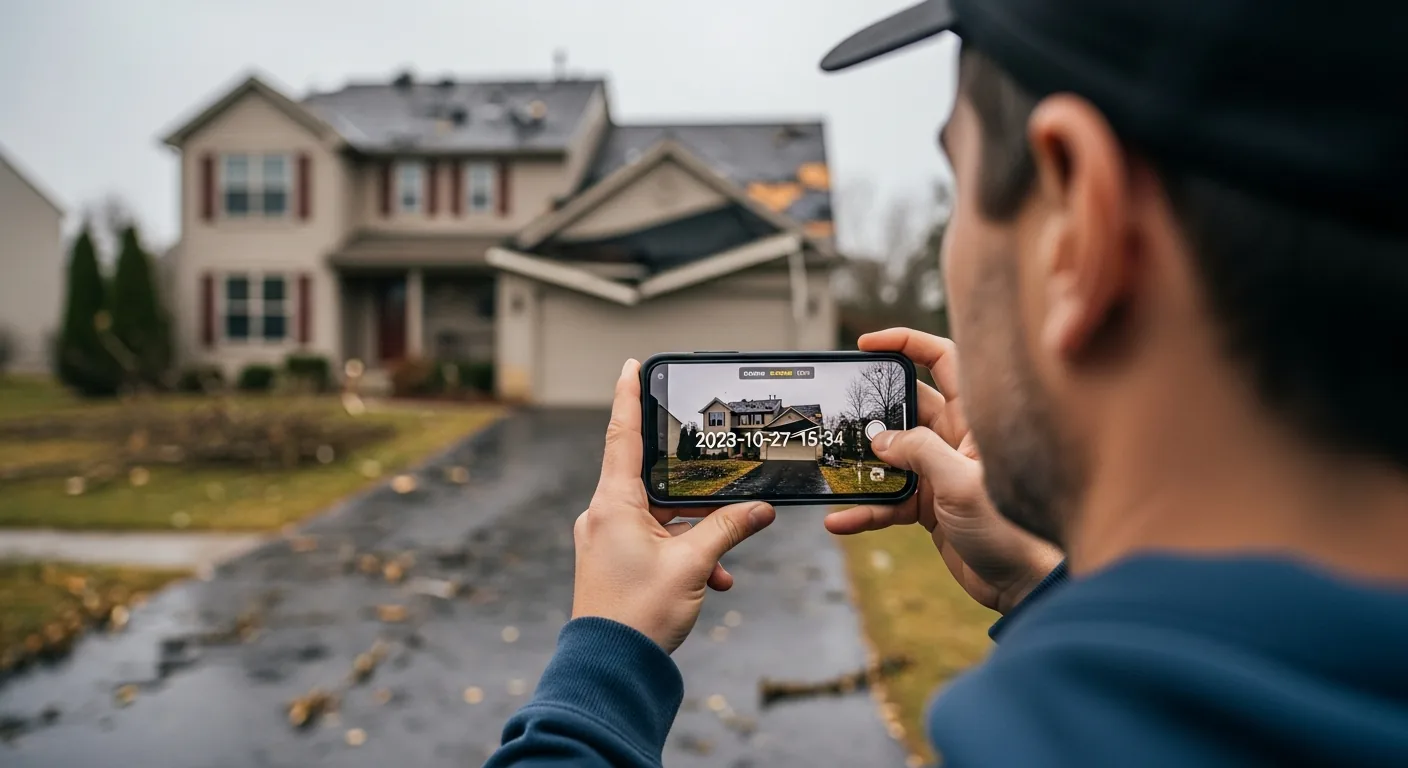
Step 2 — Document Damage Before You Cover It
Once a tarp is up, the original damage is hidden — and that is exactly when the adjuster will inspect it. Florida's CFO consumer claim guide, the North Carolina Department of Insurance, and the South Carolina Department of Insurance all explicitly tell homeowners to photograph damage before tarping, photograph the tarp installation itself, and keep every receipt for emergency repairs. Treat the documentation step as part of the tarping job, not a separate task. The five minutes you spend shooting photos before you fasten the tarp is the most leveraged five minutes in your entire claim.
| Documentation item | Why it matters for the claim |
|---|---|
| Wide exterior shots from each side of the home | Establishes wind direction, storm path, and the relationship between damage and the storm event |
| Close-ups of the roof breach (missing shingles, punctures, lifted flashing) | Shows cause and scope before the tarp covers it; counters "pre-existing damage" denials |
| Photos of the tarp installation in progress and once completed | Documents that mitigation actually happened and that workmanship was correct |
| Interior ceiling stains, drywall bulges, soaked insulation | Captures the secondary water damage downstream of the breach |
| Receipts for tarp materials, contractor labor, fans, dehumidifiers | FL CFO, NC DOI, and SC DOI all explicitly require receipts for reimbursement |
| A written timeline: storm date, damage discovered, tarping completed | Anchors the claim narrative and supports duty-to-mitigate compliance |
| Notes on the weather conditions and any safety delays | Explains why you waited if conditions forced a delayed tarping job |
What to capture before, during, and after emergency tarping
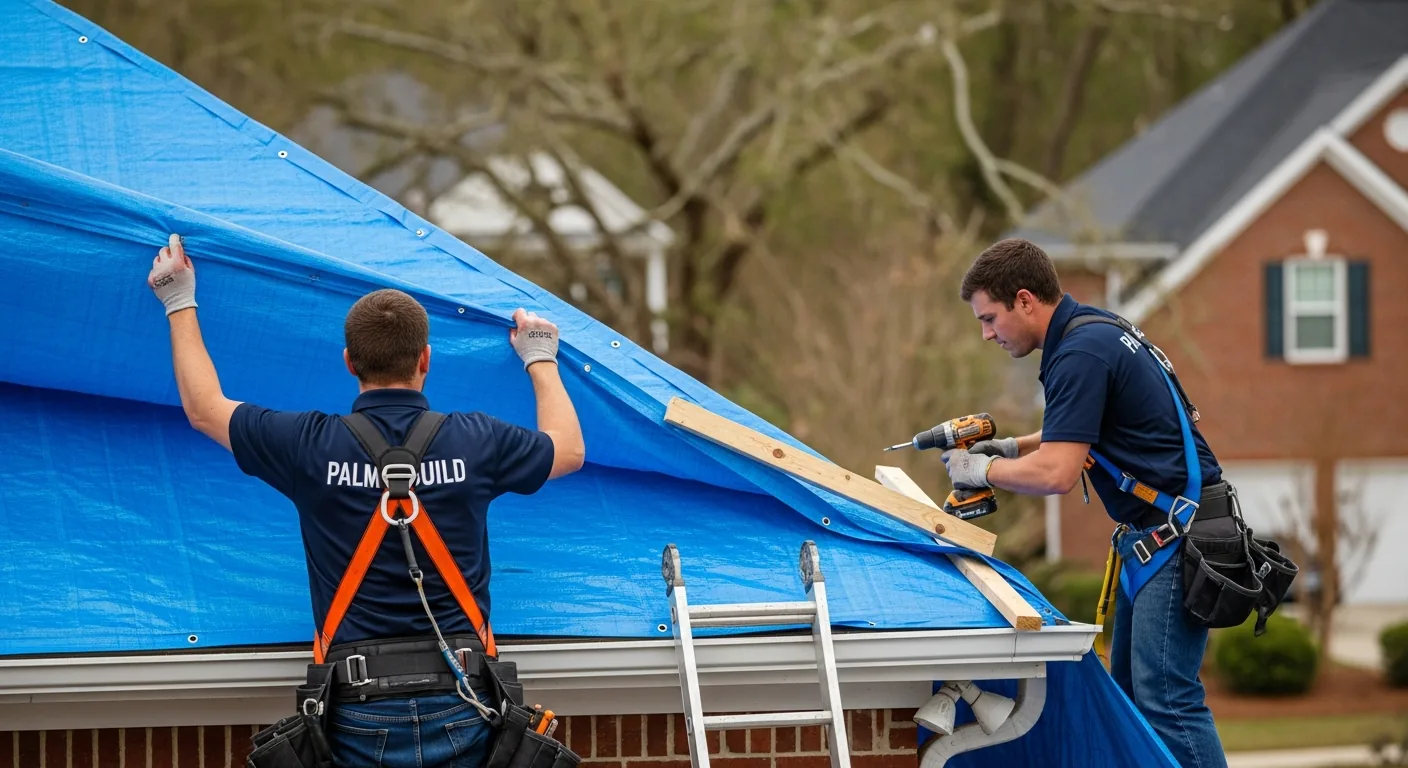
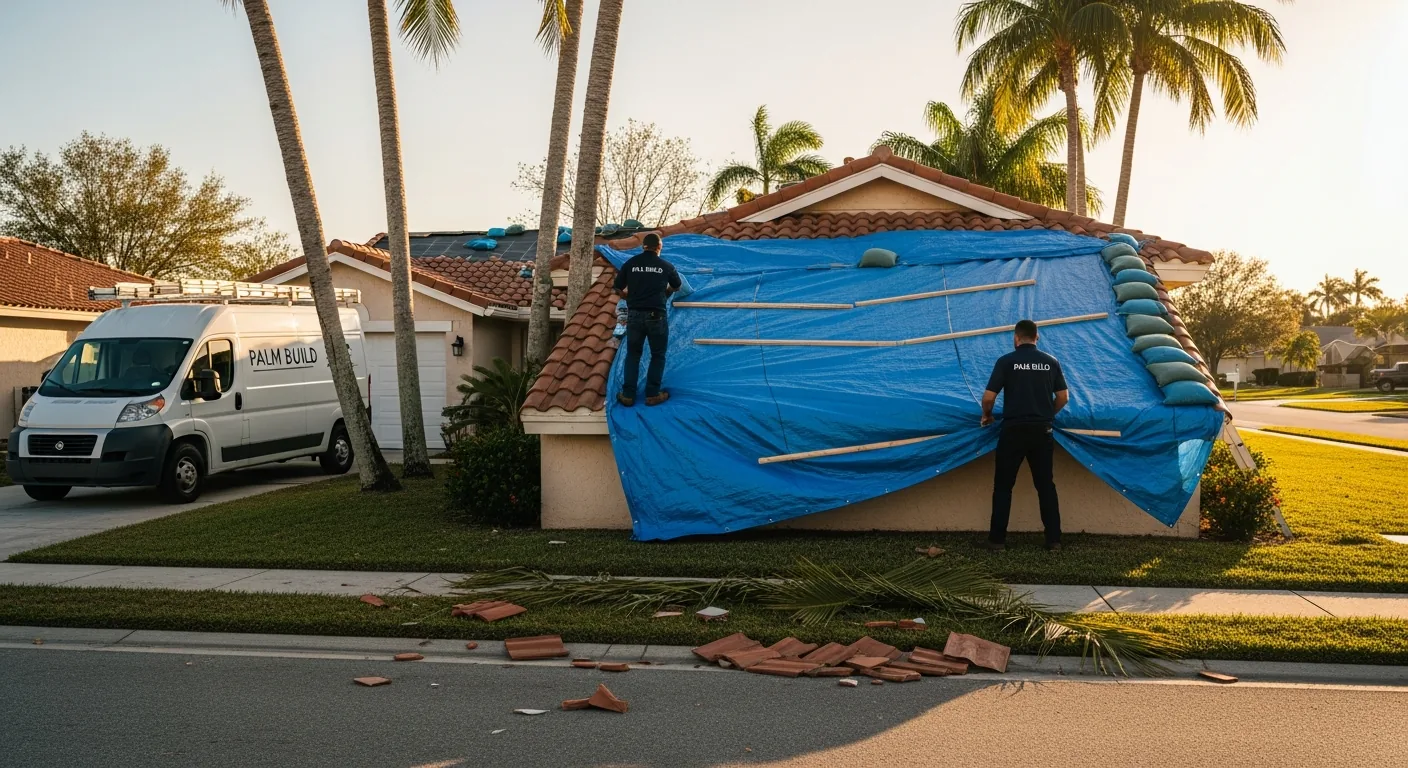
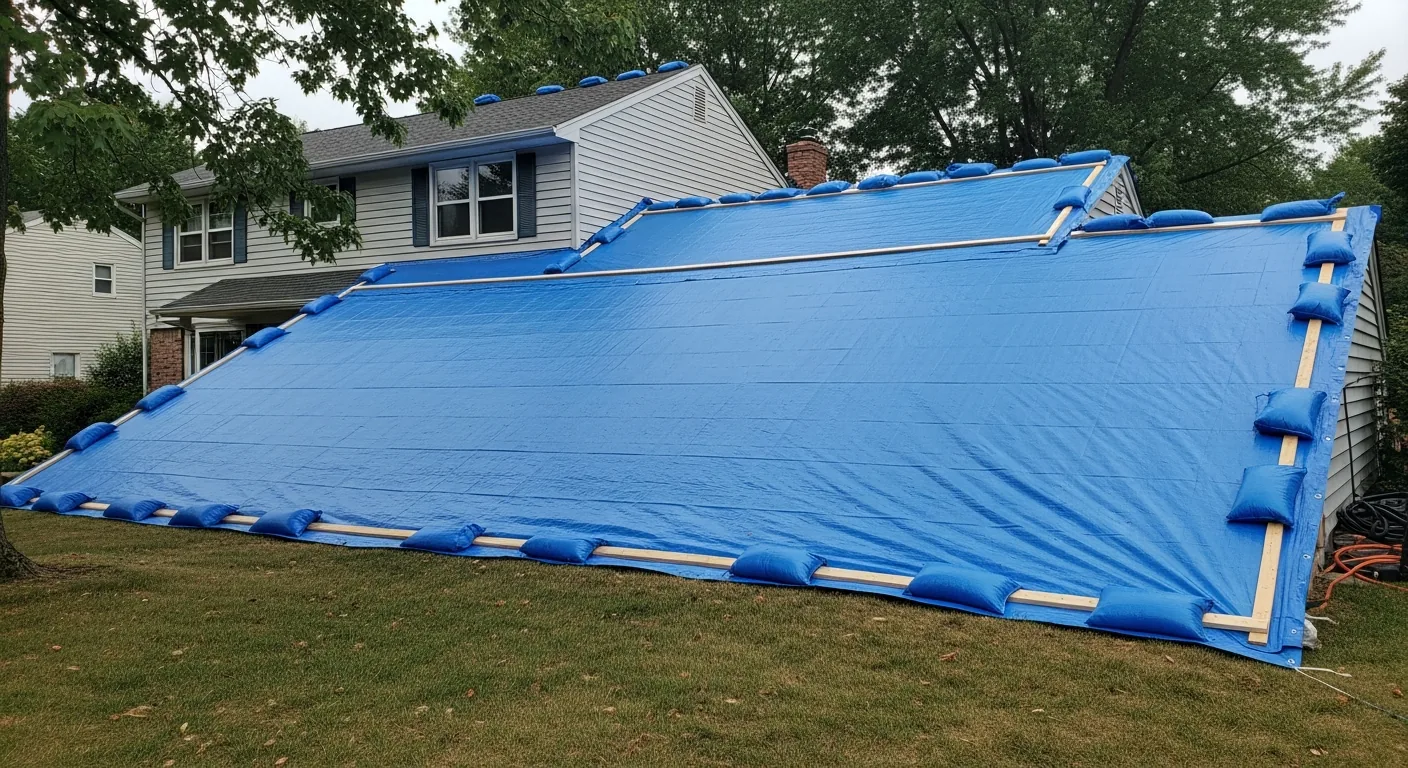
Step 3 — Install the Tarp Correctly (or Hire It Out)
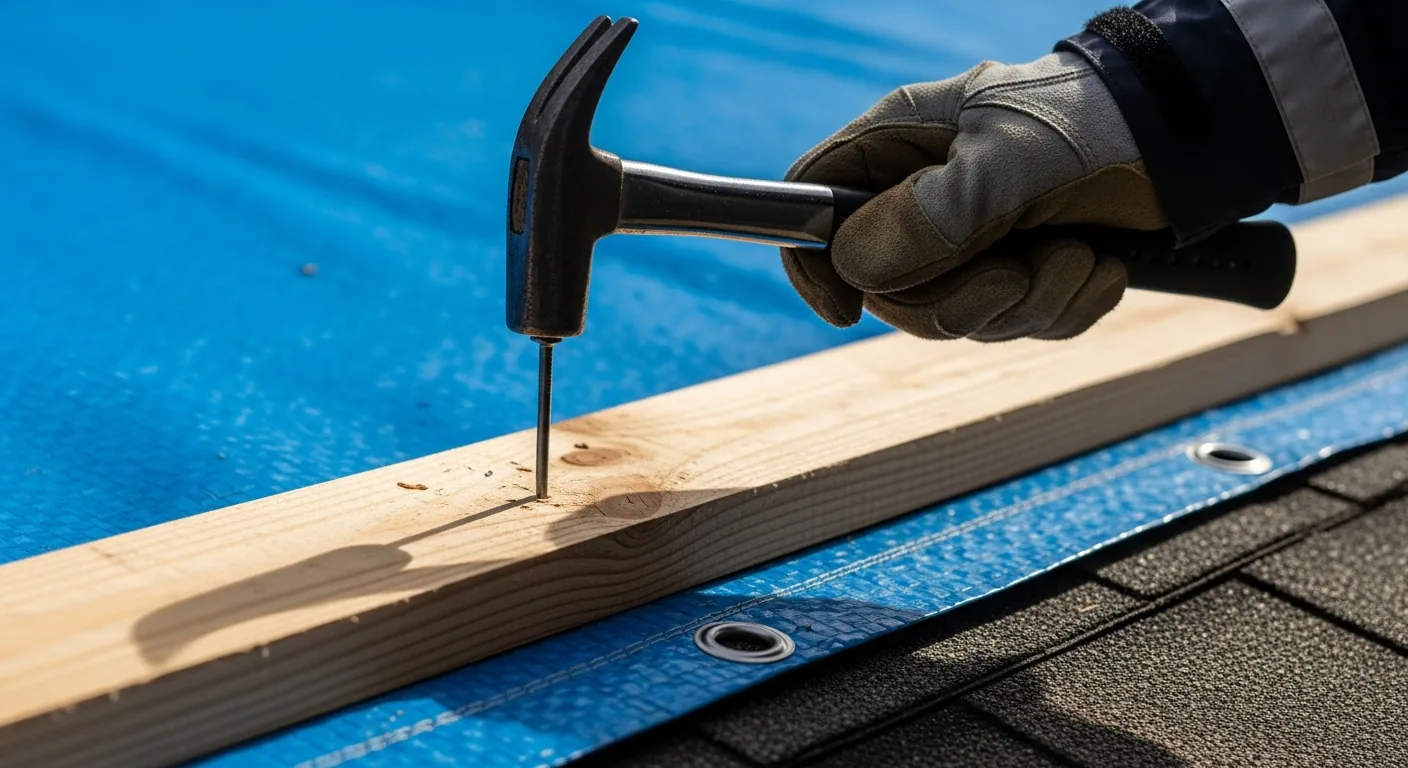
Done right, an emergency tarp is a piece of structural workmanship that buys you several weeks of dry time. The method is consistent across credible roofing references: clear all loose debris from the damaged area, cover any opening larger than a hand with 1/2-inch plywood first, deploy a heavy-duty tarp that extends at least three feet past the damage in every direction, fold the leading edge under a 2x4 wooden batten, and fasten the batten through the tarp into solid roof deck with ring-shank nails or screws every 12 inches. Repeat on all four sides. Sandbag the corners. Trim excess so wind cannot catch a loose flap.
Done right (claim-ready)
- Tarp extends at least 3 feet past the damaged area on all sides
- 1/2-inch plywood placed over any opening larger than a hand
- 2x4 wooden battens running along all four edges, not just corners
- Ring-shank nails or screws every 12 inches into solid roof deck
- Sandbags at the corners and any low edge that could catch wind
- All work photographed before and after; receipts retained
- Tarp inspected weekly for slippage, ponding, or fastener back-out
Common mistakes that void coverage
- Tarp pinned only at the corners with bricks or random weights
- Tarp sized smaller than the damage area, so water still enters
- Nails driven directly through the tarp into rotted or wet decking
- No plywood under the tarp where the opening is large or load-bearing
- Tarping on a wet or windy roof — the major OSHA-flagged hazard
- No documentation before tarping — adjuster cannot verify cause
- Tarp left up for more than 90 days — UV degrades the material
Homeowners do tarp their own roofs. They also fall off them. OSHA consistently lists falls as a leading cause of construction fatalities, and a residential roof in the wake of a storm — wet, dark, debris-covered — is a worst-case fall environment. If your roof is single-story, low-slope, dry, and your damage is small and accessible, a careful DIY tarp can hold for a few days. Anything else — two-story, steep pitch, soaked decking, large opening, after dark, or in any active weather — is a job for a crew with harnesses and anchors. The cost of an emergency call is meaningfully less than an emergency room visit or a permanent disability.
Step 4 — Treat the Tarp as the Start of Restoration
Tarping stops the next round of damage. It does not reverse the damage that has already happened upstream of the breach. By the time the tarp is in place, water has likely soaked the attic insulation, run down through ceiling cavities, and reached the drywall, hardwood, and subfloor below. The next phase is mitigation: extracting standing water, drying structural materials, and inspecting for hidden moisture before walls go back together. The EPA's 24–48 hour mold window is the controlling clock — see our water mitigation after a roof leak overview for the standard restoration arc.
Hour 0–6
Stabilize the loss
Make safe, contain interior water, document the damage, and tarp once weather permits. The mold clock is now ticking.
Hour 6–24
Begin extraction and structural drying
Remove standing water, set air movers on saturated assemblies, and start tracking moisture readings against a sketched floor plan.
Hour 24–72
Verify drying and contain mold risk
Confirm with a moisture meter that wet materials are returning to dry standard. Set containment if mold growth is suspected within the EPA's 24–48 hour window.
Week 1–2
Adjuster inspection and scope alignment
Walk the carrier's adjuster through the loss with photo log, moisture readings, and an independent contractor scope to align the line-item estimate.
Week 2–12
Permanent reconstruction with tarp removal
Code-compliant reroofing, drywall, and finishes. Tarp comes off the same day the new roofing crew arrives.
What Insurance Expects in Florida, North Carolina, and South Carolina
Every Florida, North Carolina, and South Carolina homeowners policy includes a duty to protect property from further damage. Tarping is exactly that — a textbook example of reimbursable emergency mitigation, recognized by all three state insurance departments and the National Association of Insurance Commissioners. The reverse is also true: failing to mitigate after the storm has passed gives the carrier grounds to deny part or all of the loss. The state-specific rules below set the deadlines, the deductible math, and the documentation cadence around that duty.
Storm-damaged roofs across the Palm Build service area — terracotta tile in Florida, asphalt shingle in the Carolinas, standing-seam metal on the SC coast.
Florida
Florida is the most prescriptive of the three states. Florida Statute § 627.70132 generally requires written notice of new or reopened claims within 1 year of the date of loss; supplemental claims are barred after 18 months. Once the carrier has notice, the 60-day pay-or-deny clock starts (subject to statutory tolling). The hurricane deductible applies during the named-storm period and continues until 72 hours after the National Hurricane Center lifts the last watch or warning anywhere in Florida. For the full statutory framework, see our Florida 1-year filing deadline deep dive — and if your policy is with Citizens, see our Citizens claim guide. For seasonal preparation, see our hurricane preparation checklist for Florida 2026.
North Carolina
North Carolina's structure is different in two important ways. Wind and hail can be excluded from a primary policy on coastal counties and placed into a separate policy through the North Carolina Insurance Underwriting Association — the Coastal Property Insurance Pool. That means a hurricane in Wrightsville Beach or the Outer Banks can produce two or three claims with different deductibles and different adjusters. The NC DOI consumer FAQ points to a 30-day acknowledgment expectation rather than a fixed pay-or-deny clock, and explicitly notes that protective measures like tarping are reimbursable when reasonable and documented. Identify which policies apply before you sign any contract — and see our storm damage insurance claim guide for the full claim arc.
South Carolina
South Carolina sits between Florida's prescription and North Carolina's flexibility. If your insurer requires written proof of loss, they must furnish the form within 20 days of notice. The Department of Insurance consumer FAQ indicates many claimants are contacted by an adjuster within 48 hours and explicitly states that protective measures — tarps, board-up, and similar mitigation — are reimbursable. SC DOI also recommends invoking your policy's appraisal clause before litigation when the dispute is over repair amount rather than coverage. For the wind-versus-flood split that drives most coastal claims, see our wind damage vs. flood damage breakdown — and for SC-specific seasonal preparation, our South Carolina hurricane preparation checklist.
Avoid Storm-Chasers and Price Gouging
After a major storm, the most common consumer harm is not the damage itself — it is the unlicensed contractor who shows up unsolicited, demands a deposit, and disappears. Florida's Department of Business and Professional Regulation, the North Carolina Licensing Board for General Contractors, and the South Carolina Department of Labor, Licensing and Regulation all run public license-verification portals. Take 90 seconds to look up any contractor who knocks on your door. Florida, North Carolina, and South Carolina all have anti-price-gouging statutes that activate during a declared state of emergency — get written estimates, never sign a contract under pressure, and report unconscionable pricing to your state attorney general.
- Check the contractor's state license number on the FL DBPR / NC LBGC / SC LLR portal
- Verify the company has a physical local address and a working office phone
- Ask for proof of general liability and workers' compensation insurance
- Get a written, itemized estimate before signing — emergency call, materials, labor
- Walk away from any "sign now or the offer expires" pressure tactic
- Confirm the contractor will accept payment after the work is complete (deposits should be modest)
- Save the estimate, contract, and receipts for the FL CFO / NC DOI / SC DOI claim file
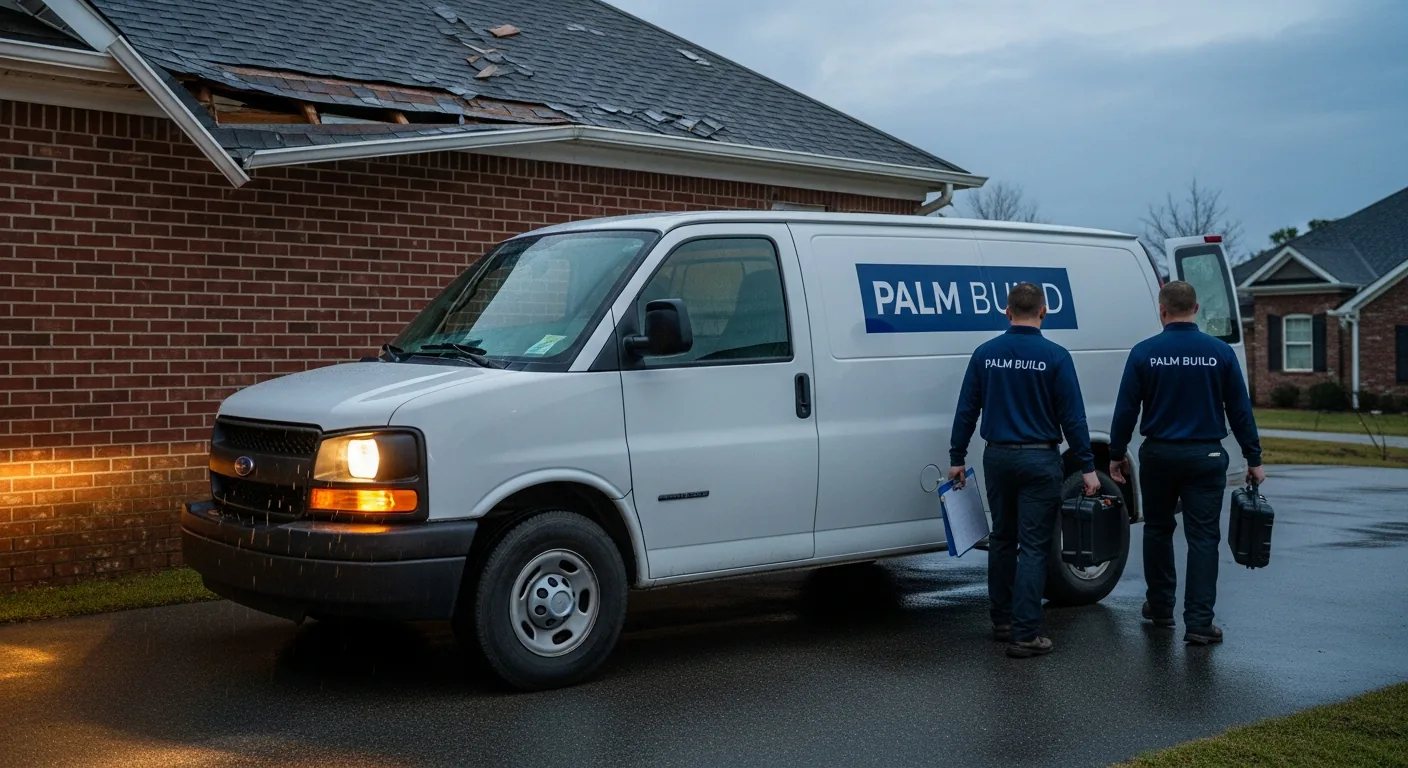
How Palm Build Handles Emergency Tarping Across FL, NC & SC
Palm Build's IICRC-certified crews respond 24 hours a day, 7 days a week across Florida, North Carolina, and South Carolina. We arrive with the tarps, plywood, battens, harnesses, and ladders that a correct installation actually requires — and we arrive with the documentation framework adjusters approve. Every Palm Build tarping job ships with timestamped photos before, during, and after, an itemized invoice in claim-ready format, and the moisture readings that anchor the insurance restoration process. When water has already entered the structure, the same crew transitions into water mitigation and, if needed, code-compliant reconstruction without losing chain-of-custody on the loss. For HOA-managed buildings and multi-unit properties, see our commercial tarping for HOA and multi-unit properties overview.
"Tarping is documented mitigation, not a patch job. Every photo, every receipt, every batten is a brick in the wall an adjuster cannot deny."
Storm, Wind & Hurricane Damage
24/7 emergency tarping, board-up, and large-loss response across Florida, North Carolina, and South Carolina.
Water Damage Restoration
IICRC S500-aligned mitigation, structural drying, and moisture documentation that adjusters approve.
Mold Remediation
Containment, removal, and post-remediation verification when storm water sits longer than the 48-hour mold window.
Insurance Restoration Process
How Palm Build coordinates directly with FL, NC, and SC carriers from initial claim through rebuild completion.
Reconstruction Services
Code-compliant reroofing, framing, and finishes after emergency tarping comes off.
OSHA — Roofing Safety
Federal safety guidance on roof work and the explicit warning against tarping in active wind or rain.
EPA — Mold and Moisture
EPA guidance on the 24–48 hour drying window required to prevent mold growth after water intrusion.
USACE — Operation Blue Roof
FEMA-funded free temporary roofing program after presidential disaster declarations — eligibility, signup, and limits.
Frequently Asked Questions
How much does emergency roof tarping cost? +
How fast do I need to tarp my roof after storm damage? +
Will homeowners insurance cover roof tarping after a storm? +
Should I wait for the adjuster before tarping? +
Can I tarp my roof myself? +
How long can a roof tarp stay up? +
What are signs my tarp is failing? +
Is FEMA's Blue Roof program available, and who qualifies? +
Storm-damaged roof? We tarp it within hours, 24/7 across FL, NC & SC.
Palm Build's IICRC-certified crews respond around the clock with documented, claim-ready tarping that protects your home and your insurance claim.
Found this helpful? Send it to someone who needs it.