Quick Answer
Professional mold remediation follows a repeatable seven-step process: (1) inspection and moisture mapping, (2) containment with plastic barriers and negative air pressure, (3) HEPA air filtration and HVAC protection, (4) controlled removal of mold-damaged porous materials, (5) detailed cleaning by HEPA vacuuming and damp-wiping, (6) drying and dehumidification to verified moisture targets, and (7) post-remediation verification before any rebuild. Most contained, single-area jobs take 1–3 days, while multi-room or hidden-cavity work can run several days to a couple of weeks. Homeowner cost guides put a typical project around $1,200–$3,750 (about $2,300 on average), or roughly $10–$25 per square foot. The throughline: mold is a moisture problem first, so a good crew fixes the water before it ever cleans the mold.
Key takeaways
- Professional mold remediation is a seven-step process — inspect and map moisture, contain, filter, remove, clean, dry, verify — not a one-time spray treatment.
- Mold is a moisture problem first. A crew that does not find and fix the water source is setting you up for regrowth.
- Most contained, single-area jobs take 1–3 days; multi-room or hidden-cavity work runs several days to a couple of weeks.
- Expect roughly $1,200–$3,750 for a typical job (about $2,300 average), or $10–$25 per square foot, with cost driven mainly by how long materials stayed wet.
- Licensing differs by state: Florida licenses mold assessors and remediators and enforces a 12-month conflict-of-interest rule, while North Carolina and South Carolina currently license neither — making IICRC S520 vetting essential.
If you have never watched a mold remediation crew work, the process can feel like a mystery — plastic walls go up, machines start humming, and parts of your wall disappear into sealed bags. None of it is improvised. Done right, mold remediation is a disciplined safety-and-quality workflow built on EPA, CDC, OSHA, and IICRC S520 guidance, designed to remove the mold without spreading spores through the rest of your home and to keep it from coming back. Here is exactly what happens on a real job, step by step — what each phase accomplishes, what the equipment is for, what it costs, how long it takes, and the licensing rules that change the picture in Florida, North Carolina, and South Carolina.
Dry materials within this window after a leak and mold usually won't grow (EPA)
24–48 hrs
Indoor relative humidity the EPA recommends to limit mold (CDC says no higher than 50%)
Below 60%
Average residential mold remediation project (Angi/HomeAdvisor, 2025-26)
~$2,300
Typical timeline for a contained, single-area job
1–3 days
What Mold Remediation Companies Actually Do
Strip away the equipment names and a reputable mold remediation job answers one question: how do we remove the mold and the moisture feeding it without contaminating the rest of the house? Every legitimate crew works through the same backbone — find the moisture, seal off the work area, filter the air, remove what cannot be saved, clean what remains, dry everything to a measured target, and verify the result before rebuilding. The difference between a good company and a bad one is not the list of steps; it is the discipline inside each one.
It helps to know the vocabulary, too: 'mold removal' describes physically taking mold out, while remediation is the larger job of returning the space to a normal, dry, contamination-free condition and preventing regrowth — we cover the distinction in mold removal vs. mold remediation. What separates professional work from a quick spray-and-wipe is containment, filtration, verified drying, and documentation. The industry consensus standard, ANSI/IICRC S520, and the EPA's mold guidance both treat those controls — not a particular chemical — as the heart of real remediation.
Why the Process Starts With Moisture Control
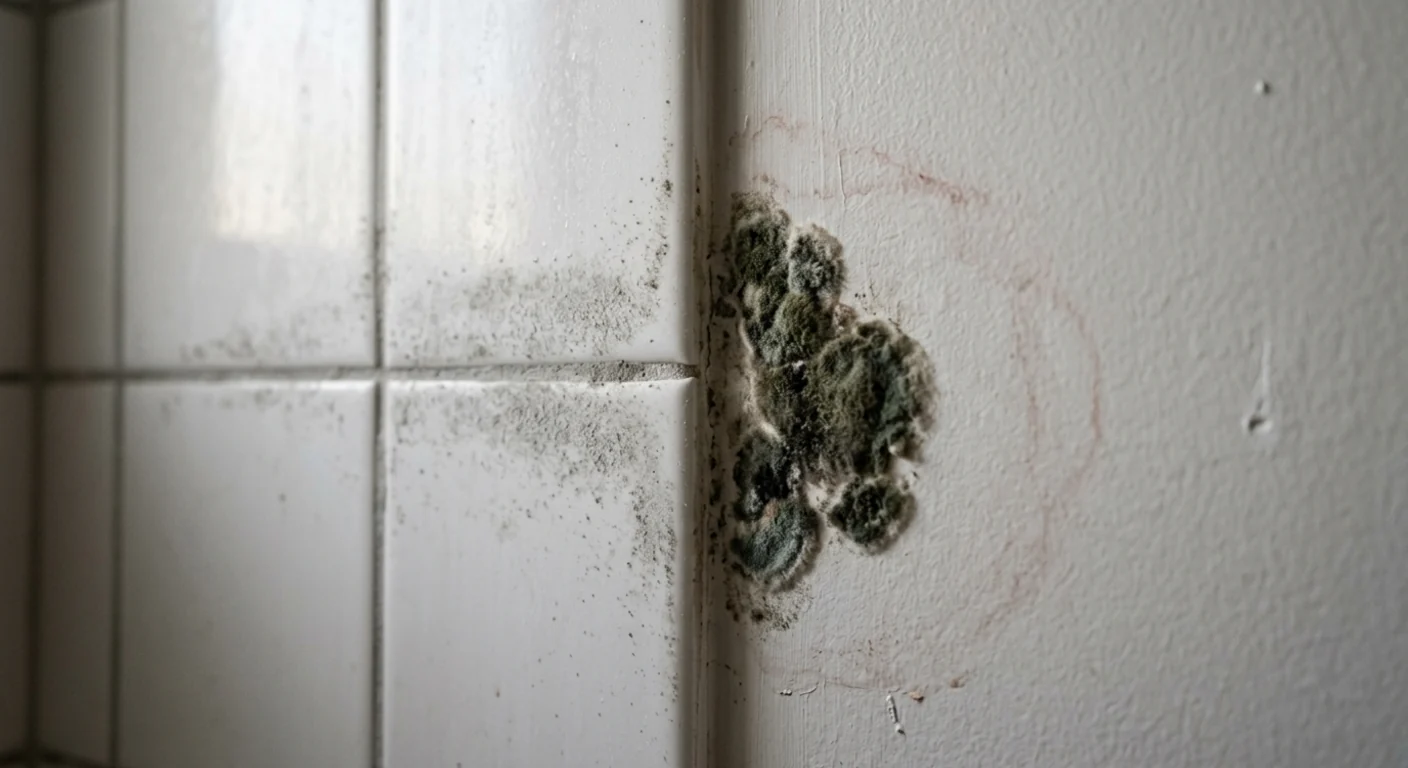
Mold is not really a cleaning problem — it is a moisture problem that shows up as mold. Spores are already in every building; they only colonize when materials stay damp. That is why the EPA stresses that drying wet materials within 24–48 hours often prevents mold entirely, and why a crew that cleans without finding and fixing the water source is setting you up for a repeat. We break that clock down in how fast mold grows after water damage.
Long after the visible mold is gone, humidity decides whether it returns. The EPA recommends keeping indoor relative humidity below 60% (ideally 30–50%), and the CDC advises no higher than 50% where possible. In humid markets like Florida and the coastal Carolinas, that ongoing humidity control — not the initial cleanup — is the most common point where a job quietly fails. Stopping the original water, whether from a burst pipe or appliance leak handled as water damage restoration or a storm-driven roof leak, is step zero.
The Step-by-Step Mold Remediation Process
Here is what professional mold remediation actually looks like, step by step — the sequence a certified crew follows on a typical job. Each step has a purpose, and skipping any one of them is exactly where shortcuts show up later — usually as mold that comes back.
- 1
Inspection and moisture mapping
The crew locates every wet material and hidden moisture source with meters and, where needed, thermal imaging — because cleaning without fixing the water almost guarantees regrowth.
- 2
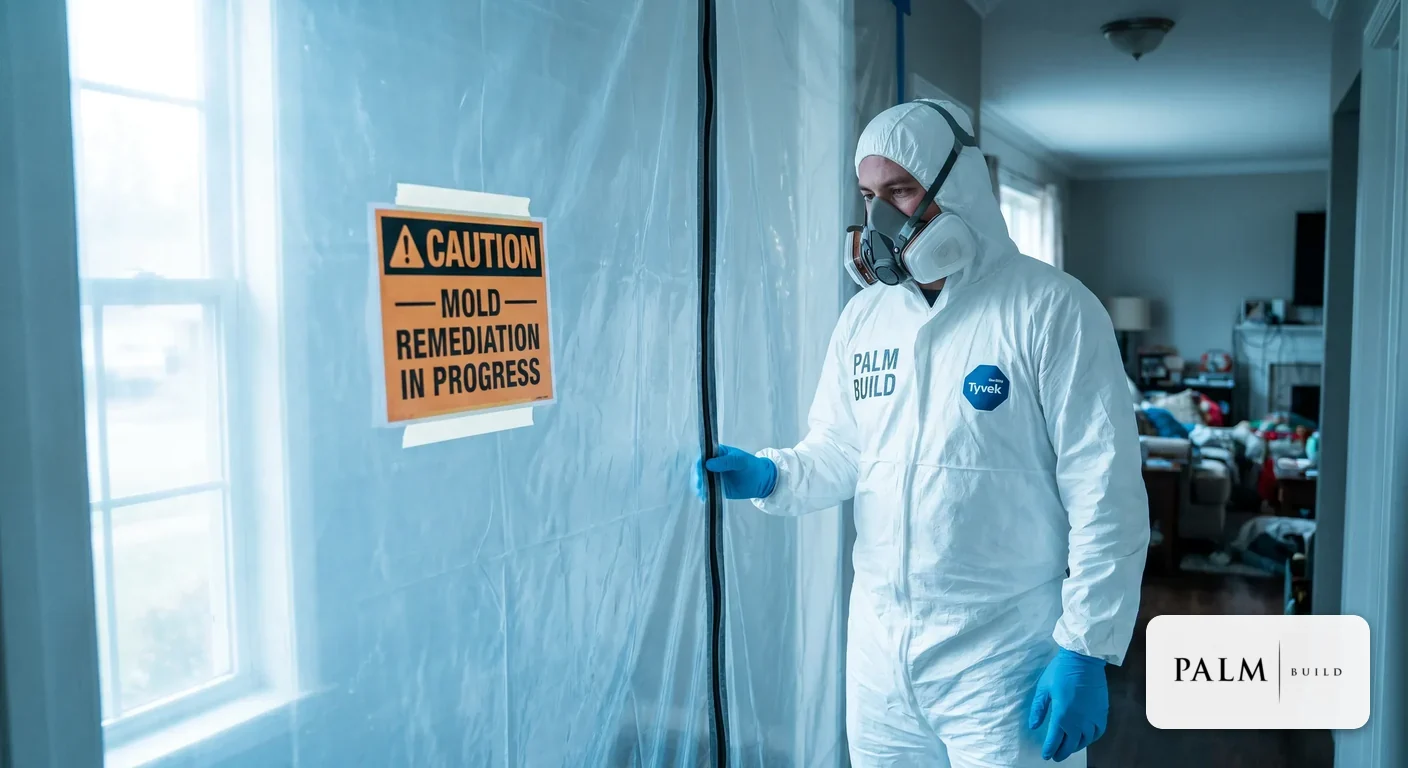
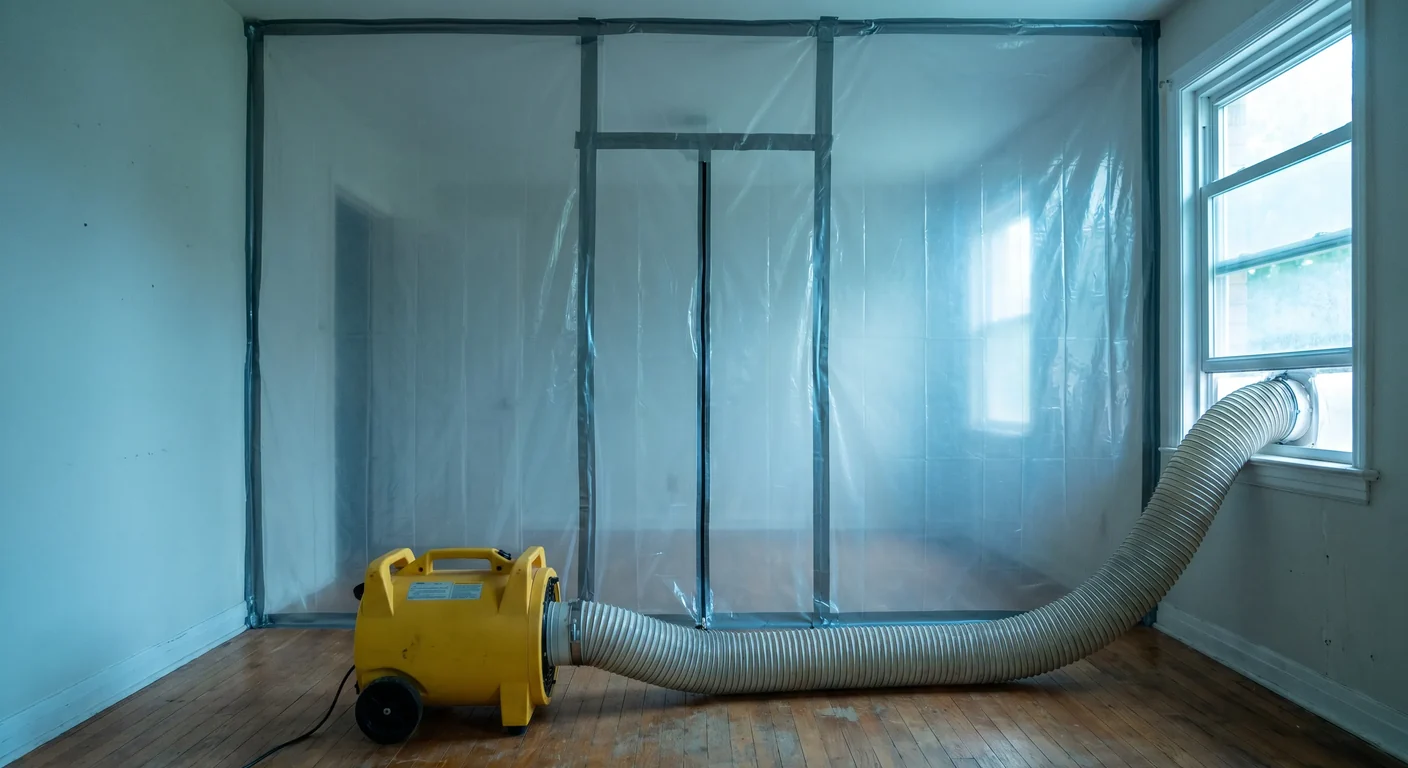
Containment and negative air
Plastic sheeting walls seal the work area, and a negative-air machine keeps it under lower pressure than the rest of the house so spores cannot drift out during demo.
- 3
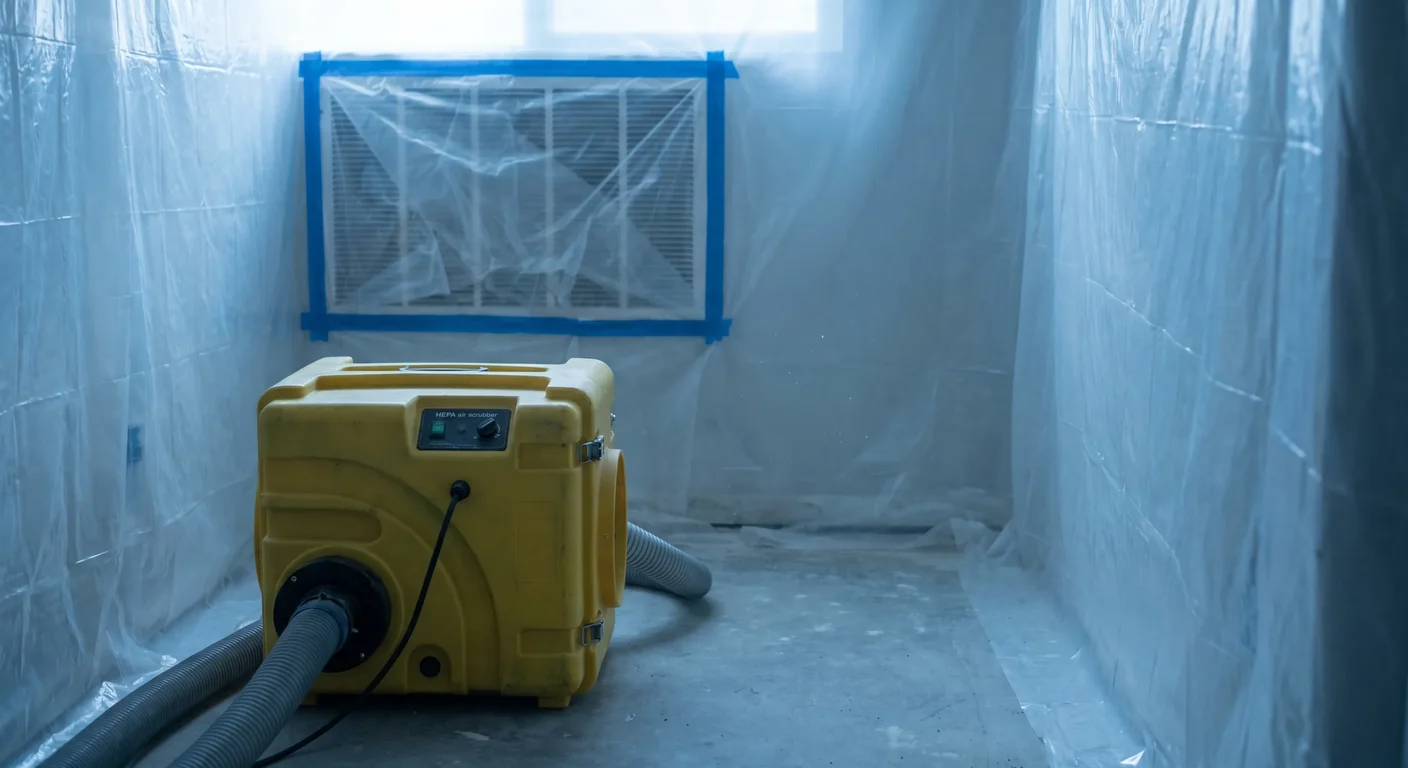
Air filtration and HVAC protection
HEPA air scrubbers capture airborne spores while work is active, and supply and return vents inside the containment are sealed so the HVAC system does not spread contamination.
- 4
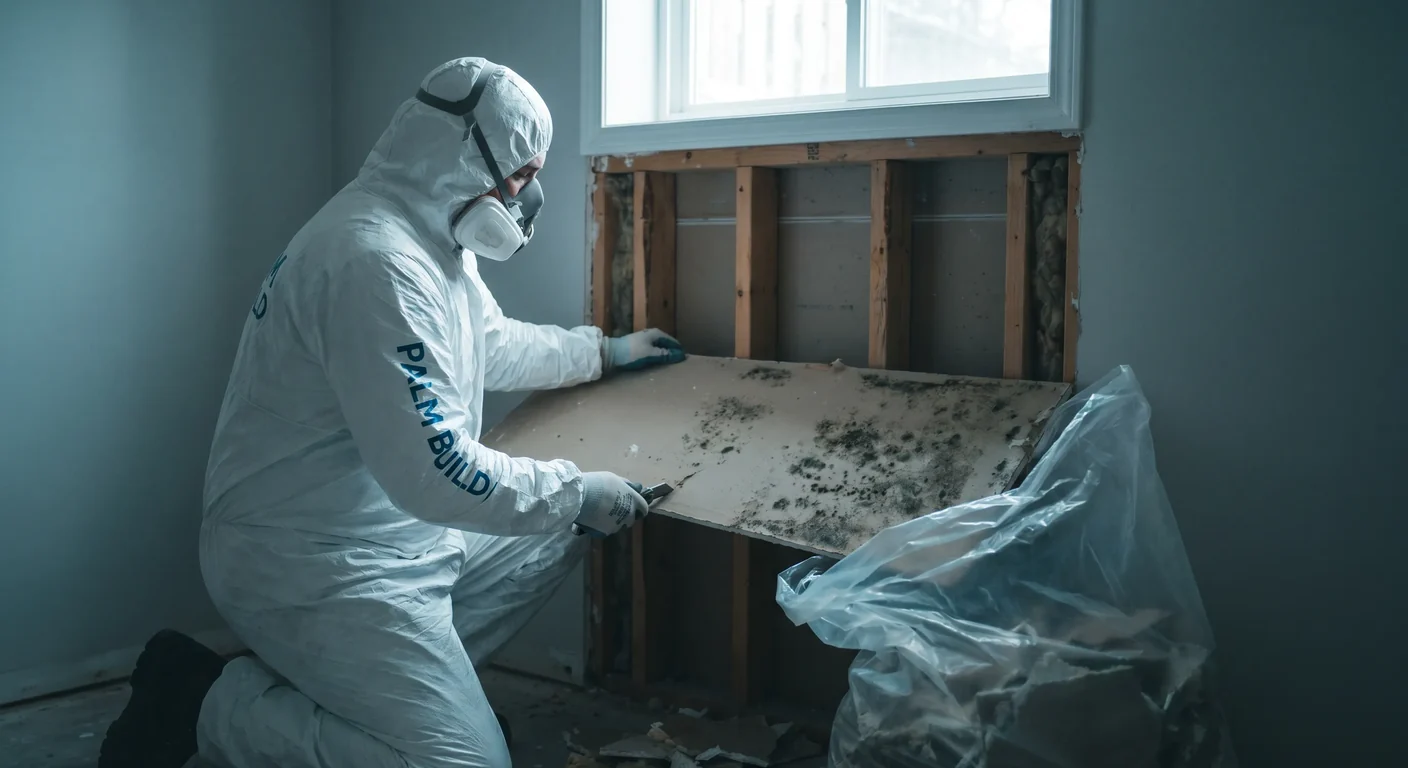
Controlled removal of damaged materials
Porous materials that mold has colonized — drywall, insulation, carpet — are cut out along clean lines and sealed in poly bags before they ever leave the containment.
- 5
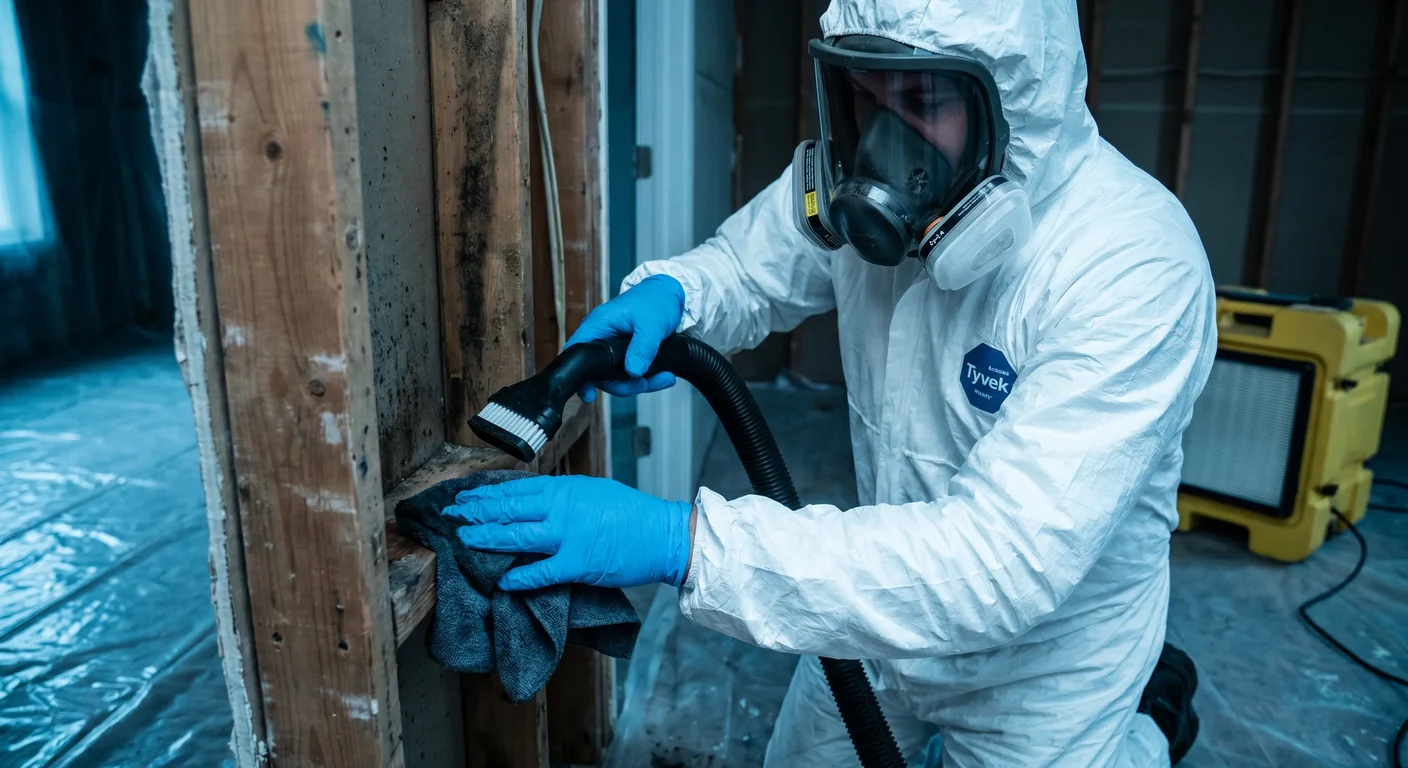
Detailed cleaning: HEPA vacuum and damp-wipe
Remaining surfaces and the work area are HEPA-vacuumed and then damp-wiped with detergent, the step where low-quality jobs most often cut corners.
- 6
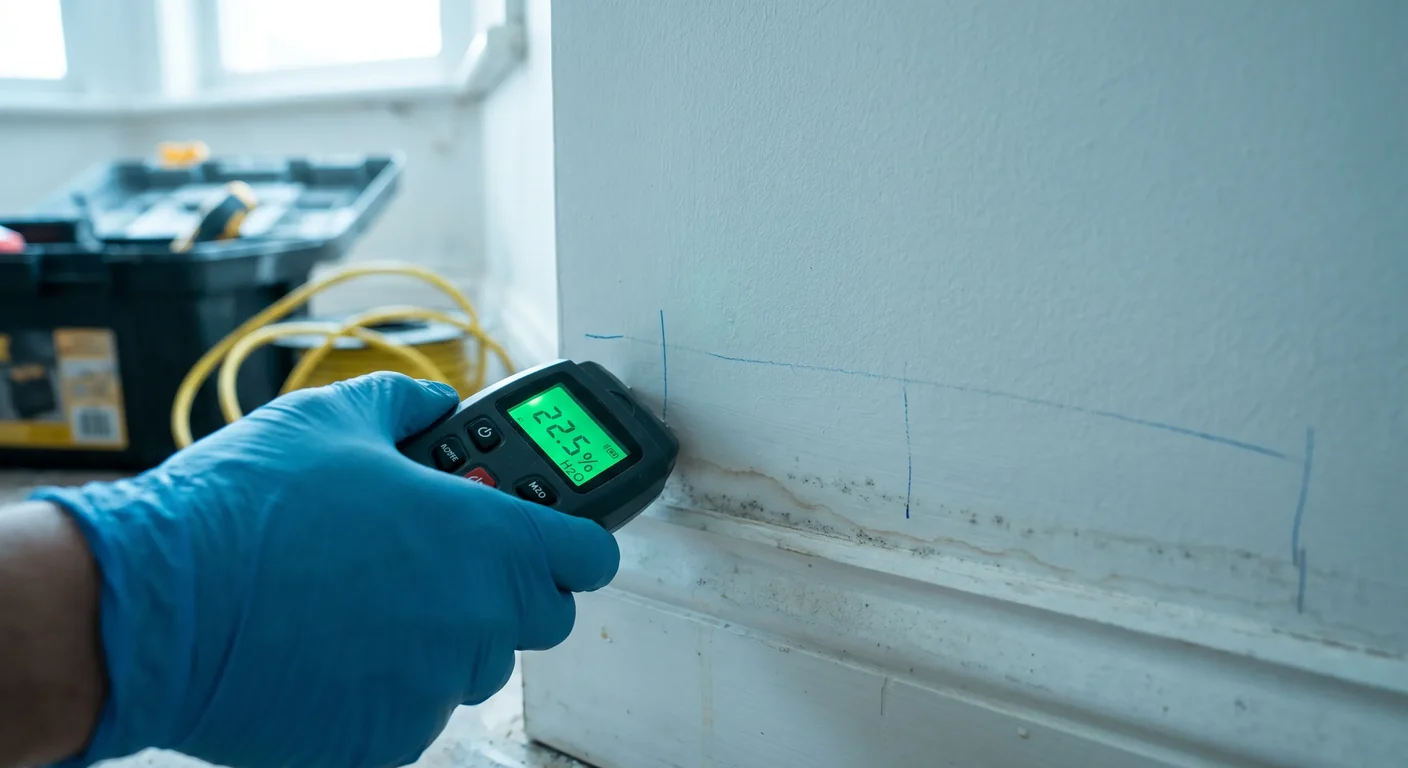
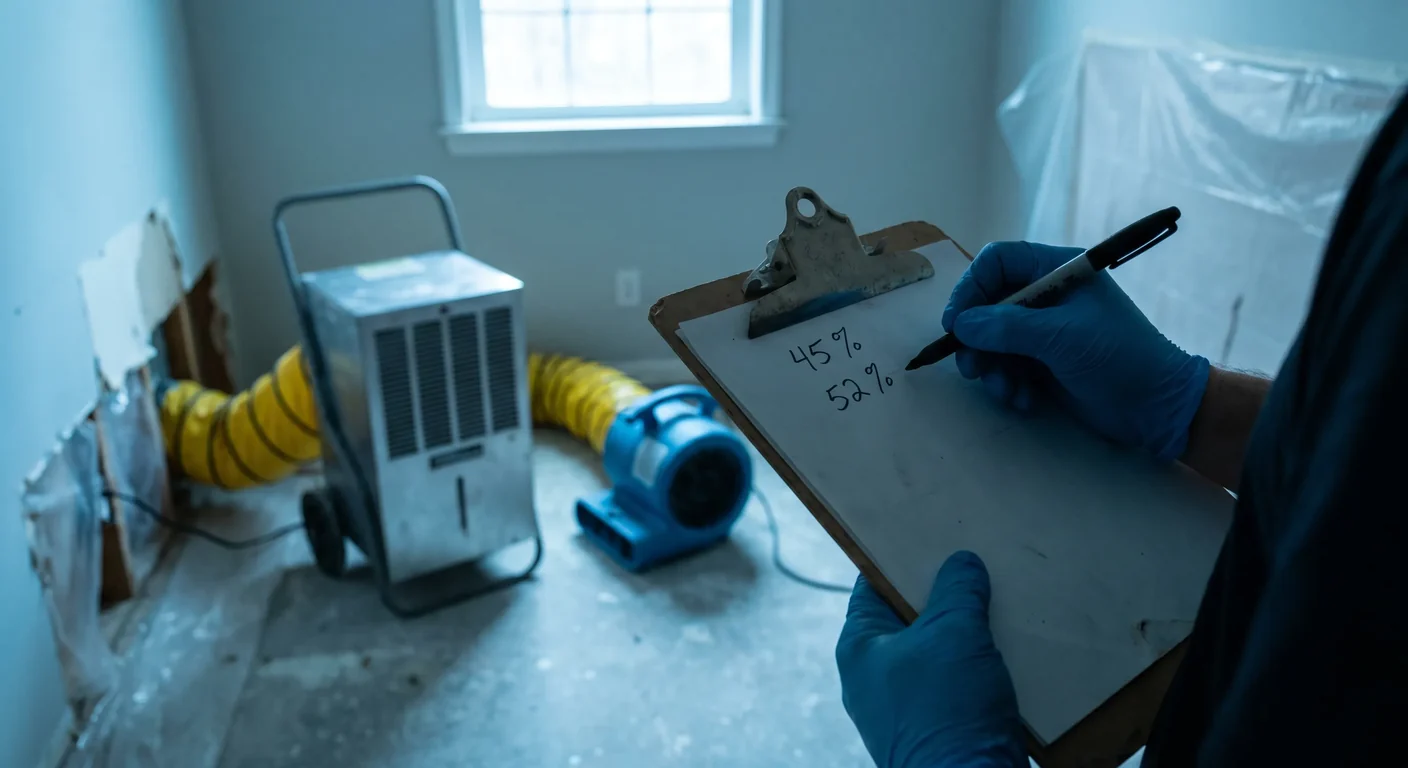
Drying, dehumidification, and moisture verification
Air movers and dehumidifiers bring materials back to a measured dry standard, documented with moisture readings rather than guesswork.
- 7
Post-remediation verification and rebuild readiness
A final check confirms the area is visibly clean, dry, and odor-free — and, on larger jobs, an independent verification — before any reconstruction begins.
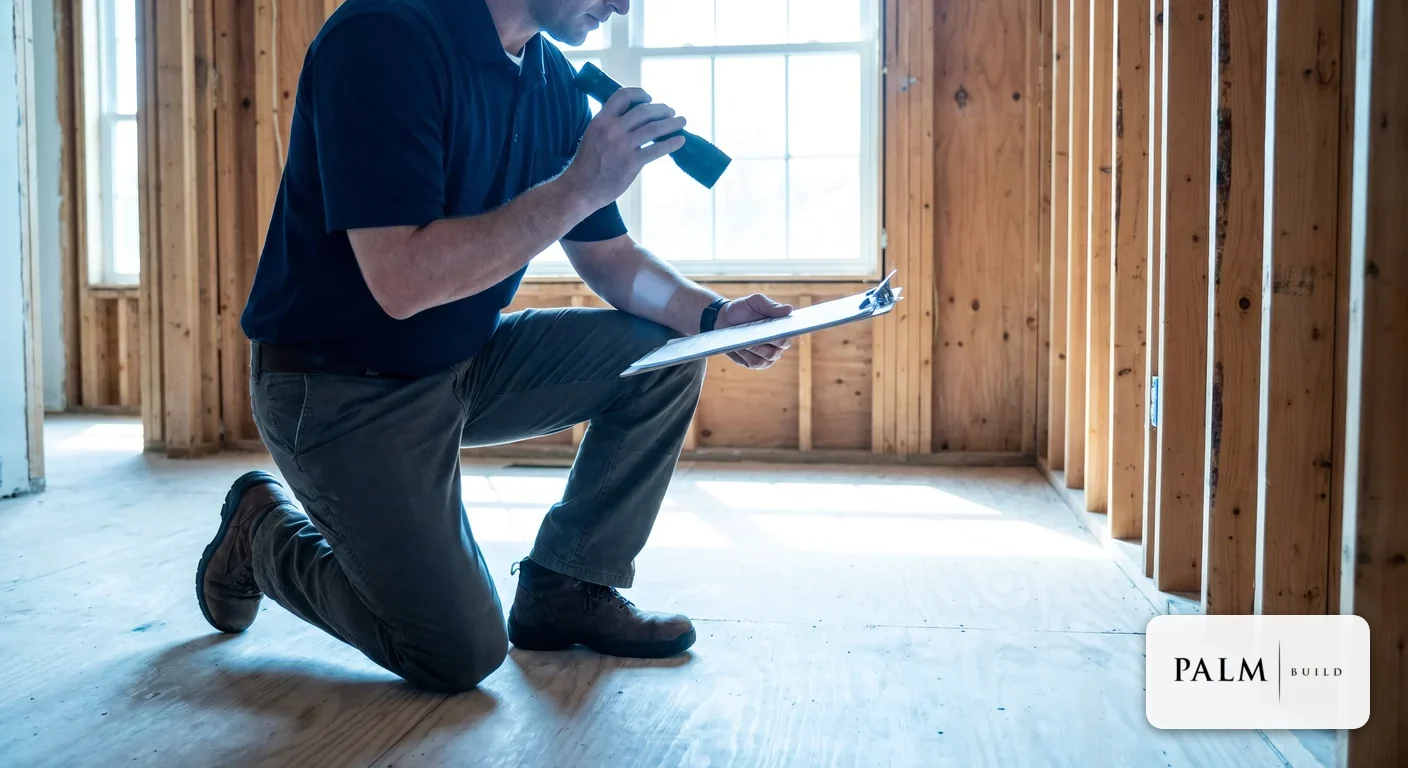
Step 1: Inspection and moisture mapping
Every credible job starts with a diagnosis, not a demo hammer. Technicians walk the space with moisture meters and infrared cameras to find where water is hiding — behind baseboards, under flooring, inside wall cavities — and trace it back to a source like a leak, condensation, or prior water damage. This 'moisture map' defines the real scope, because the mold you can see is often smaller than the wet zone feeding it. It also becomes the baseline the crew will later have to prove they dried.
Step 2: Containment and negative air
Before anything is disturbed, the crew seals the work zone with polyethylene sheeting and a zippered entry, then runs a negative-air machine that exhausts HEPA-filtered air outside. That keeps the contained room at slightly lower pressure than the rest of the house, so when demolition stirs up spores, air flows in — never out into your living space. The EPA's remediation guidance describes exactly this approach for larger jobs: poly barriers, negative pressure with HEPA-filtered exhaust, and blocking the vents inside the containment.
Step 3: Air filtration and HVAC protection
Inside the containment, HEPA air scrubbers run continuously, pulling airborne particles out of the air while cutting, scraping, and vacuuming are underway. Just as important, the crew tapes off supply and return registers so your air handler does not pull spores from the work area and blow them through the whole house — a common way DIY attempts turn a small problem into a whole-home one. OSHA notes that any work disturbing mold raises airborne exposure, which is why filtration runs the entire time, not just at the end.
Step 4: Controlled demo and material removal
Some materials can be cleaned; others cannot. Once mold colonizes the inside of porous materials like drywall, insulation, and carpet, the EPA notes they often have to be discarded. The crew cuts these out along straight 'cut lines' a measured distance past the visible growth, then bags the debris in heavy poly — often 6-mil — inside the containment before carrying it out. Non-porous framing, studs, and concrete are usually cleaned in place. What gets removed here is what defines how much reconstruction follows.
Step 5: Detailed cleaning — HEPA vacuum and damp-wipe
With the damaged material gone, the crew cleans everything that stays. The standard sequence the EPA and OSHA describe is HEPA-vacuum, then damp-wipe with a detergent solution, leaving surfaces visibly clean and dry. This is the unglamorous step that separates a lasting result from a callback: spores settle on framing, subfloor, and the containment itself, and a quick wipe-down without HEPA vacuuming just redistributes them. Biocides or 'fogging' are sometimes used, but they are never a substitute for physically removing the mold and the moisture.
Step 6: Drying, dehumidification, and moisture verification
Cleaning a damp cavity accomplishes nothing if it stays damp, so the crew installs air movers and dehumidifiers and dries materials back to a documented standard. A quality job ties completion to actual structural drying and moisture verification readings — comparing suspect materials to a dry reference — rather than 'it looks dry.' In Florida and the Carolinas, where ambient humidity fights you the whole way, those logged readings are the difference between done and 'done for now.'
Step 7: Post-remediation verification and rebuild readiness
Finally, the work is checked before anything is rebuilt. The remediator confirms the area is clean, dry, and free of musty odor — a 'post-remediation evaluation.' On larger or higher-stakes jobs, ANSI/IICRC S520 describes an independent 'post-remediation verification' (PRV) by a separate indoor-environmental professional, so the company that did the work is not the only one signing off. Not every job needs lab sampling, but you should always get documentation — photos, moisture logs, and a clear scope — showing the environment is back to normal. Only then does reconstruction and rebuild begin.
Cost and Timeline Expectations
Because this is a process post, treat these numbers as ranges, not quotes — but they tell you what 'normal' looks like before anyone steps on site. For a full pricing breakdown by scope, severity, and location, see our mold remediation cost guide.
| Scenario | Typical price | What drives it |
|---|---|---|
| Typical residential job | ~$1,200–$3,750 (avg ~$2,300) | Containment, HEPA filtration, cleaning, and drying — sometimes minor rebuild |
| Per square foot (common pricing model) | ~$10–$25 / sq ft | Labor, containment complexity, material removal, and verification |
Typical mold remediation price bands (Angi, HomeAdvisor, This Old House, 2025-26). Your project can land anywhere in the range depending on scope and rebuild.
| Timeline | When it applies |
|---|---|
| 1–3 days | Mold is confined and accessible and the moisture source is already fixed |
| Several days to ~1 week | Multiple rooms, behind-wall cavities, or HVAC involvement |
| 1–2+ weeks | Tied to prior flooding, large-loss demolition, and reconstruction sequencing |
What typically drives the timeline.
The single biggest multiplier is moisture history. If materials sat wet past the 24–48 hour window, crews find more hidden growth and need more containment and demolition — and crawl spaces, attics, and HVAC-adjacent contamination raise labor and PPE on top of that.
Florida, North Carolina & South Carolina: Licensing That Changes the Process
The steps above are national. What changes by state is who is legally allowed to do mold work and how the inspection-versus-remediation relationship is regulated — and that directly affects what a 'reputable process' looks like where you live.
How to Prepare Your Home and What to Ask Your Contractor
You do not run the remediation, but a few moves on your side protect your health, your belongings, and your wallet — and the right questions quickly separate a professional crew from a risky one. Whether you can stay in the home during the work depends on the scope and who lives there; vulnerable people especially should limit exposure during spore-aerosolizing work, which we cover fully in can you stay in your house during mold remediation.
- Move valuables, electronics, and anything porous out of the affected area before work starts.
- Clear a path to the work zone and to the nearest exterior door for the negative-air ducting.
- Confirm who in the home has asthma, allergies, or a weakened immune system, and plan their exposure accordingly.
- Ask for the moisture readings and a written scope before demo begins, and photos throughout.
- Keep every document for your insurer — see how we handle insurance restoration documentation.
Signs of a professional crew
- Maps moisture and traces the water source before any demo
- Sets plastic containment and runs HEPA filtration under negative air
- Ties completion to logged moisture readings, not 'looks dry'
- Provides photos, a written scope, and verification documentation
- In Florida, is licensed and explains the assessor/remediator separation
Red flags to walk away from
- Quotes a price over the phone without inspecting for moisture
- Relies on spraying or 'fogging' instead of containment and removal
- Cannot explain how they will stop cross-contamination or protect the HVAC
- Skips drying verification and leaves no documentation
- Pushes mandatory mold testing as the main service when it is often unnecessary
Frequently Asked Questions
What should I expect during the mold remediation process? +
Is mold testing necessary before remediation? +
Can mold come back after remediation? +
How much does mold remediation cost? +
Do I need a licensed mold remediation company in Florida? +
Related Guides & Next Steps
Professional Mold Remediation
IICRC S520 containment, HEPA filtration, and verified drying across FL, NC, and SC.
Mold Removal vs. Mold Remediation
The difference between taking mold out and fully restoring the space.
Mold Remediation Cost Guide 2026
Current pricing by scope, location, and severity so you can budget the job.
How Fast Does Mold Grow After Water Damage?
Why the 24-48 hour window decides whether you even need remediation.
Can You Stay in Your House During Mold Remediation?
When it is safe to stay, and when to relocate during the work.
Structural Drying & Moisture Verification
How we dry to a measured standard and prove materials are dry.
See the process done right — call Palm Build.
Palm Build's IICRC-certified crews handle mold remediation from inspection and containment through verified drying and reconstruction across Florida, North Carolina, and South Carolina — with documentation built for your insurer and 24/7 emergency response. Start with a mold assessment or talk through your situation.
Found this helpful? Send it to someone who needs it.