(888) 245-5155
Call Now 24/7
Technician responding to winter burst pipe event inside a home

Water Restoration Sub-Guide

Burst Pipe Water Damage: Response And Cleanup

Burst pipes can release significant volume in minutes. This guide focuses on source shutdown, immediate extraction strategy, and the documentation steps that protect both structure and claim clarity.

  • Freeze-Related Events
  • Multi-Room Spread
  • Emergency Extraction
  • Insurance Evidence

First-Hour Priorities

What to do immediately

Step 1

Shut main supply and isolate power in affected zone

Source control is the absolute first priority. Locate the main water shutoff valve and close it completely to stop additional flow into the structure. If water is near outlets, junction boxes, or fixtures, isolate electrical circuits at the breaker panel before entering wet spaces. Never wade into standing water in areas where live electrical connections may be submerged.

Step 2

Capture pipe failure and spread evidence

Photograph the failed line, damaged finishes, and water migration before any cleanup alters conditions. Include wide-angle shots showing the overall affected area along with close-ups of the rupture point and any visible corrosion or fitting failures. This documentation establishes the timeline and scope of damage for insurance adjusters and supports accurate repair estimates.

Step 3

Extract standing water from all connected areas

Burst pipe losses often travel under flooring and through wall cavities, so contiguous zones must be addressed together rather than one room at a time. Use truck-mounted extraction units to remove standing water rapidly from primary pooling areas, then move systematically to secondary zones where water has migrated. Pay particular attention to transitions between flooring types, as water often pools beneath thresholds and at material boundaries.

Step 4

Begin drying and monitor for hidden saturation

Set up air movers and dehumidifiers in a balanced drying configuration as soon as extraction is complete. Meter checks in lower walls, framing, subfloors, and ceiling cavities confirm whether selective demolition is needed before rebuild can begin. Daily moisture readings at documented grid points track drying progress and provide the verification records that insurers require before approving reconstruction.

In-Depth Guide

Understanding the process

Burst pipe failures fall into two broad mechanical categories: supply-line breaks and drain-line failures. Supply lines operate under constant pressure, typically 40 to 80 psi in residential systems, which means a rupture releases water continuously until the supply is shut off. This is why supply-line breaks cause the most acute damage and demand the fastest response. Drain lines, by contrast, are gravity-fed and only carry water when fixtures are in use, so failures tend to produce slower, more localized leaks. However, drain-line failures often involve Category 2 or Category 3 water, which introduces contamination concerns and may require more aggressive demolition and antimicrobial treatment of affected materials. Freeze-thaw mechanics are the leading cause of burst pipes in climates that experience winter temperatures below 20 degrees Fahrenheit. When water freezes inside a pipe, the ice itself does not cause the rupture at the freeze point. Instead, the expanding ice creates a pressure wave in the trapped water between the ice blockage and a closed valve or fixture. This hydraulic pressure builds until the pipe wall yields, often at a fitting, joint, or section of pipe weakened by age or corrosion. The break may be feet or even rooms away from the actual ice formation. Pipes in attics and exterior wall cavities are especially vulnerable because they are exposed to the coldest air temperatures and are frequently the last lines to be insulated during construction. When an attic supply line bursts, water cascades down through ceiling joists, wall cavities, and insulation before pooling on finished floors below, creating multi-system damage that can affect every level of the structure. Effective burst pipe restoration requires close coordination between the restoration company and a licensed plumber. The restoration team handles water extraction, selective demolition of saturated materials, structural drying, and moisture verification. The plumber handles the actual pipe repair, whether that involves replacing a section of line, rerouting around a compromised area, or upgrading from a failure-prone material like polybutylene to modern PEX or copper. Timing matters: extraction and drying should begin immediately, while plumbing repair can follow within 24 to 48 hours once the water source is controlled. Starting reconstruction before drying is verified to standard risks trapping moisture behind new finishes, which leads to mold growth and material failure that may not become apparent for weeks or months.

Field Visuals

Scenarios, equipment, and mitigation examples

These examples show the conditions and response patterns teams evaluate during active water losses.

Interior burst pipe emergency with active water flow and mitigation response

Active Pipe Failure Conditions

Source shutdown and hazard control must happen immediately before extraction and content movement start.

Ceiling staining and hidden spread from upper-level burst pipe leak

Vertical Migration Risk

Upper-floor line breaks can track through ceiling cavities and wall bays long before pooling becomes obvious.

Warped hardwood flooring after delayed response to water loss

Finish-System Damage Progression

Delays in extraction frequently turn a contained line break into widespread flooring and baseboard replacement.

Carpet removal and water extraction during burst pipe mitigation

Carpet Extraction and Tear-Out

Saturated carpet and pad are removed to expose the subfloor for direct drying, preventing moisture from being trapped beneath non-permeable layers.

Air movers and dehumidifiers positioned for structural drying after pipe break

Drying Equipment Deployment

Balanced placement of air movers and dehumidifiers creates airflow patterns that draw moisture from wall cavities and subfloor assemblies.

Technician using a moisture meter to monitor drying progress in wall framing

Moisture Verification Monitoring

Daily meter readings at documented grid points track drying rates and confirm when materials have reached verified dry standard for reconstruction.

Technical Workflow

How professional mitigation progresses

This sequence keeps decisions measurable, documented, and aligned with a safe transition to reconstruction.

Failure-source verification

Teams document the line location, pipe material, and failure mode to support repair coordination and insurer reporting. This includes identifying whether the break occurred at a fitting, along a straight run, or at a valve connection. Photographic evidence and written notes establish cause context that distinguishes freeze damage from pressure failure, corrosion, or mechanical impact.

Rapid extraction and containment

High-volume removal starts in primary pooling areas using truck-mounted extractors, then moves to secondary migration zones and adjacent rooms. Containment barriers are placed to prevent further spread into unaffected areas during the extraction process. In multi-story structures, vacuum extraction may be performed simultaneously on multiple floors to prevent continued vertical migration through ceiling and floor assemblies.

Material salvage triage

Finish materials are evaluated for salvage based on water contact duration, water category classification, and measurable moisture retention levels. Hardwood flooring, cabinetry, and trim may be salvageable if extraction began within the first few hours and contamination category is clean water. Materials that show swelling, delamination, or elevated moisture readings beyond manufacturer tolerances are documented for replacement and included in the loss scope.

Drying, verification, and scope handoff

Daily moisture logs at mapped grid points inform transition timing into repairs and reconstruction without hidden residual wetness. Equipment placement is adjusted based on psychrometric readings and drying rate trends to ensure efficient energy use and consistent progress. Once all materials reach verified dry standard, the drying certificate is issued and the project scope transitions to reconstruction planning with the property owner and insurer.

Cost Guidance

What to expect on pricing

Costs vary by loss size, water category, and region. These ranges reflect typical residential and commercial projects in our service areas.

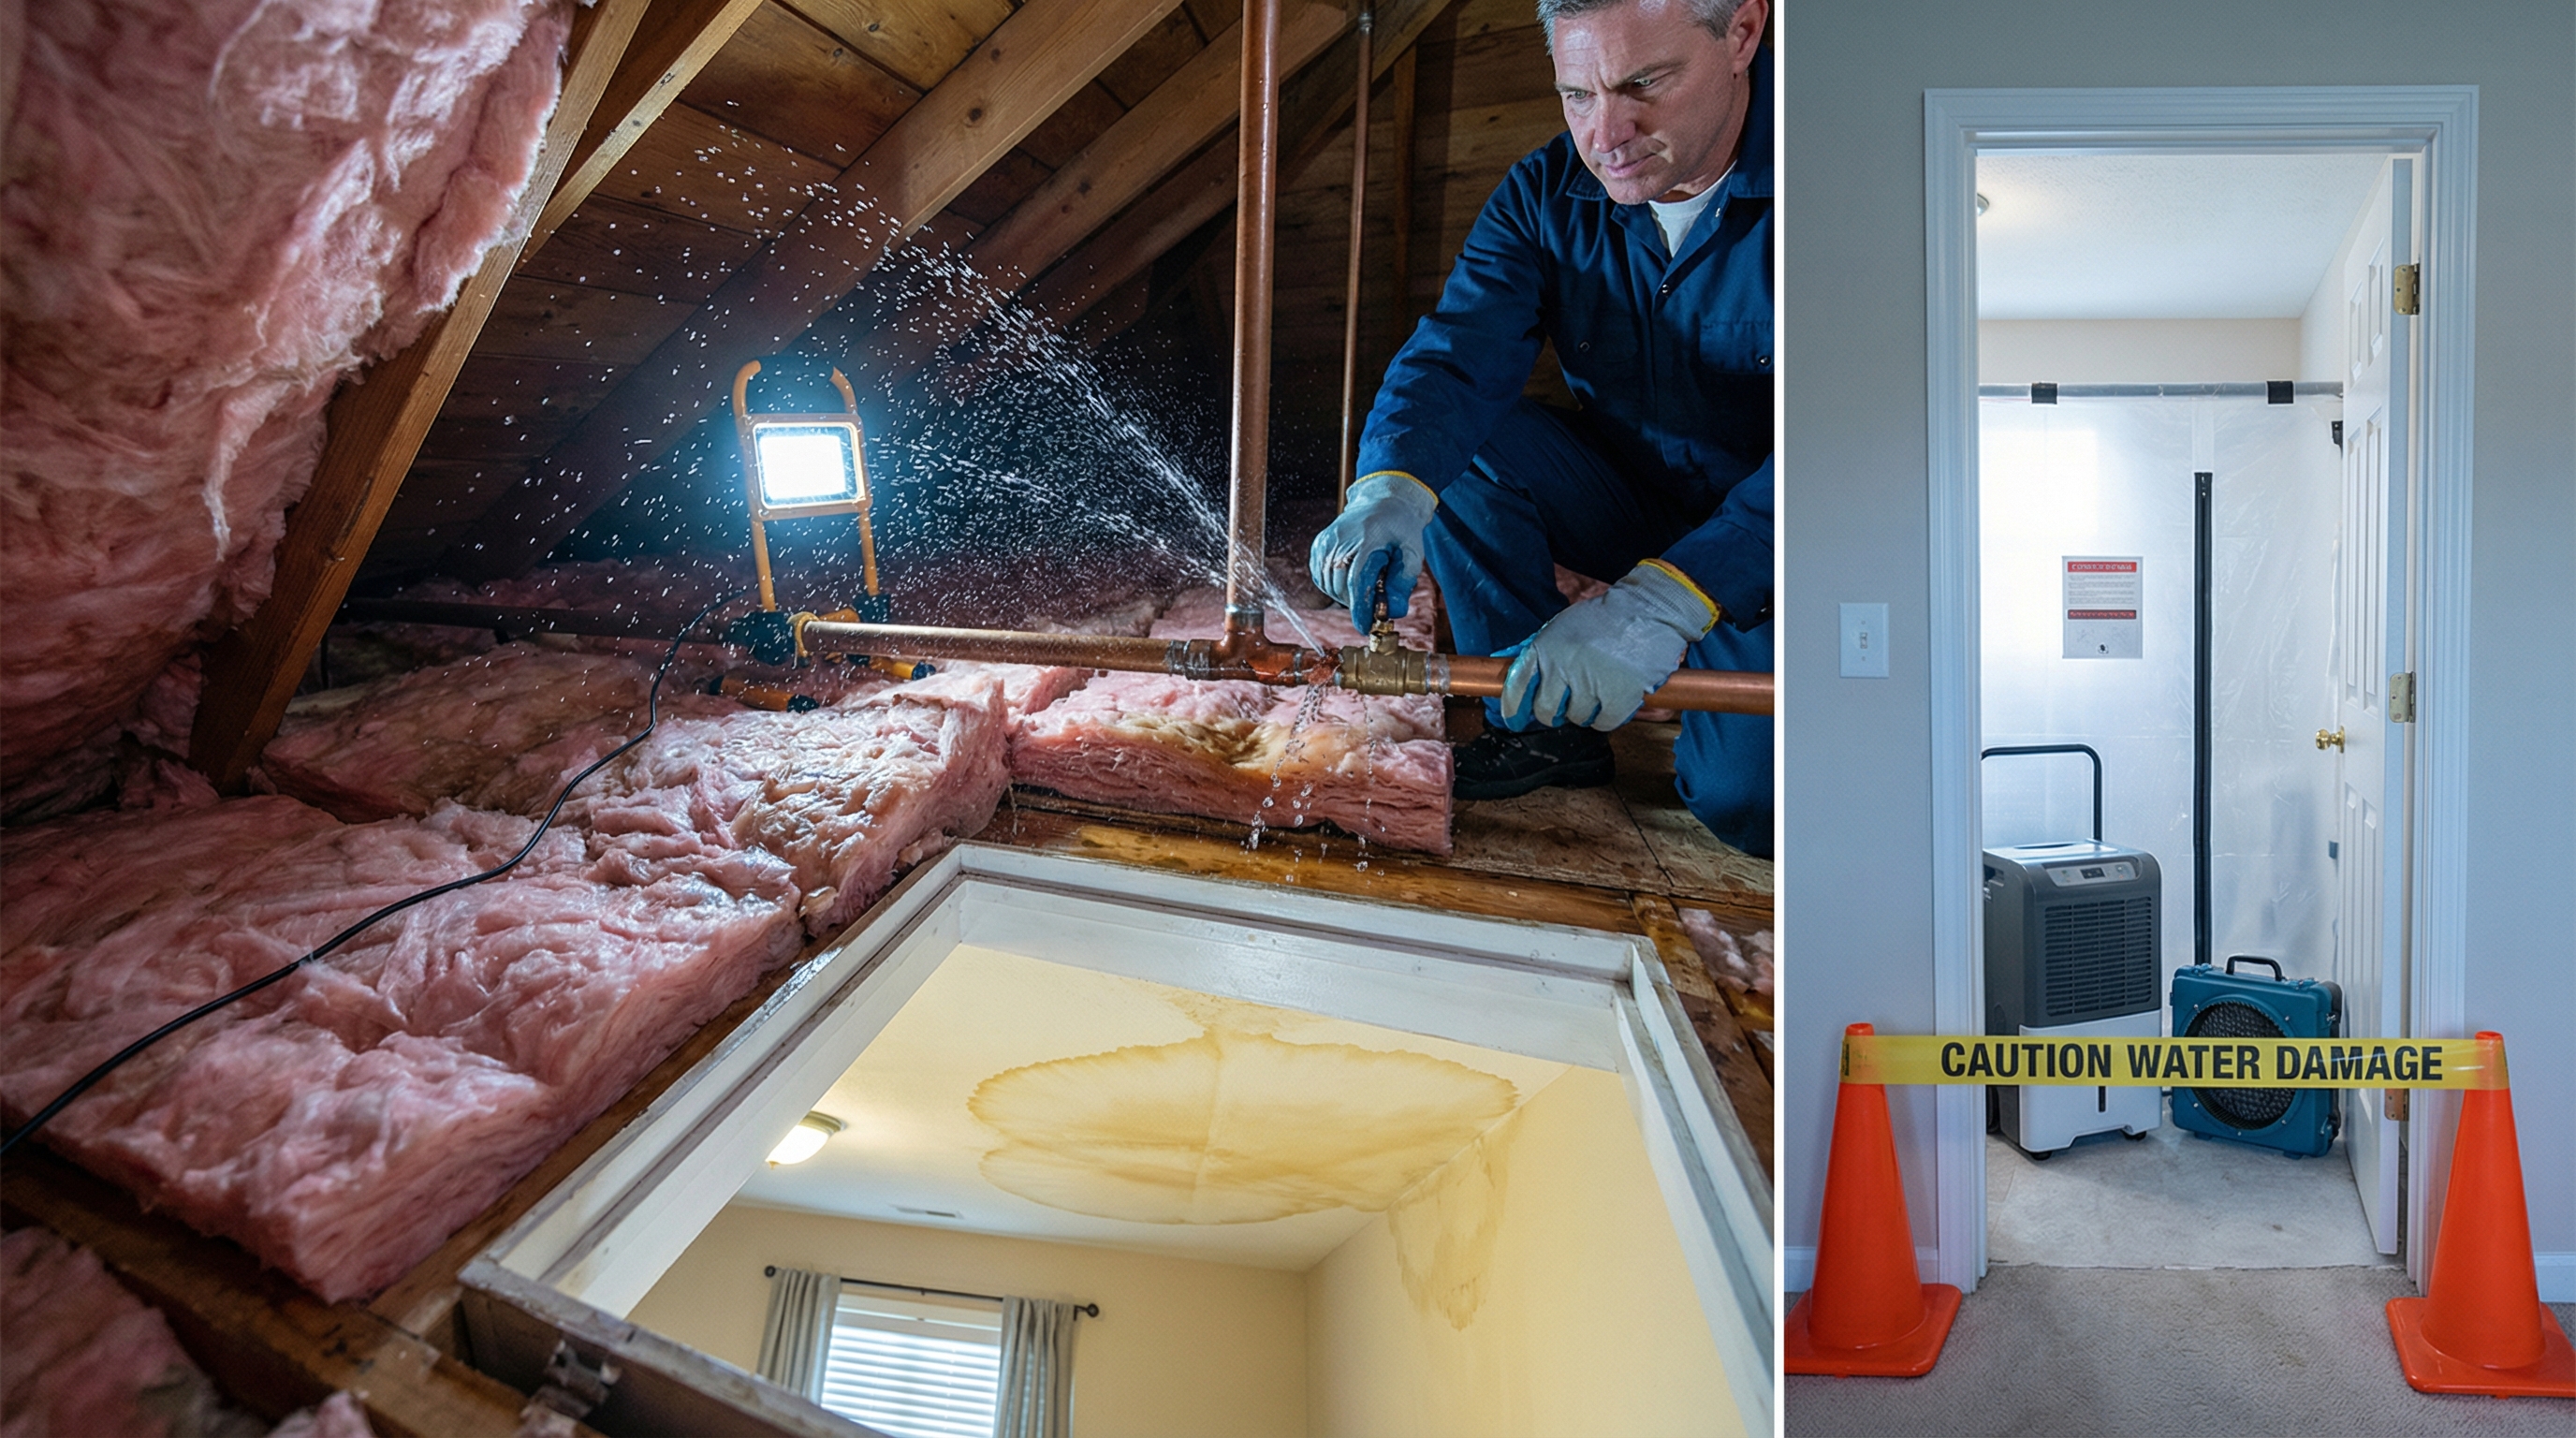
Emergency pipe shutoff and assessment

$150 - $400

Covers initial dispatch, source control, hazard evaluation, and preliminary scope documentation for the affected area.

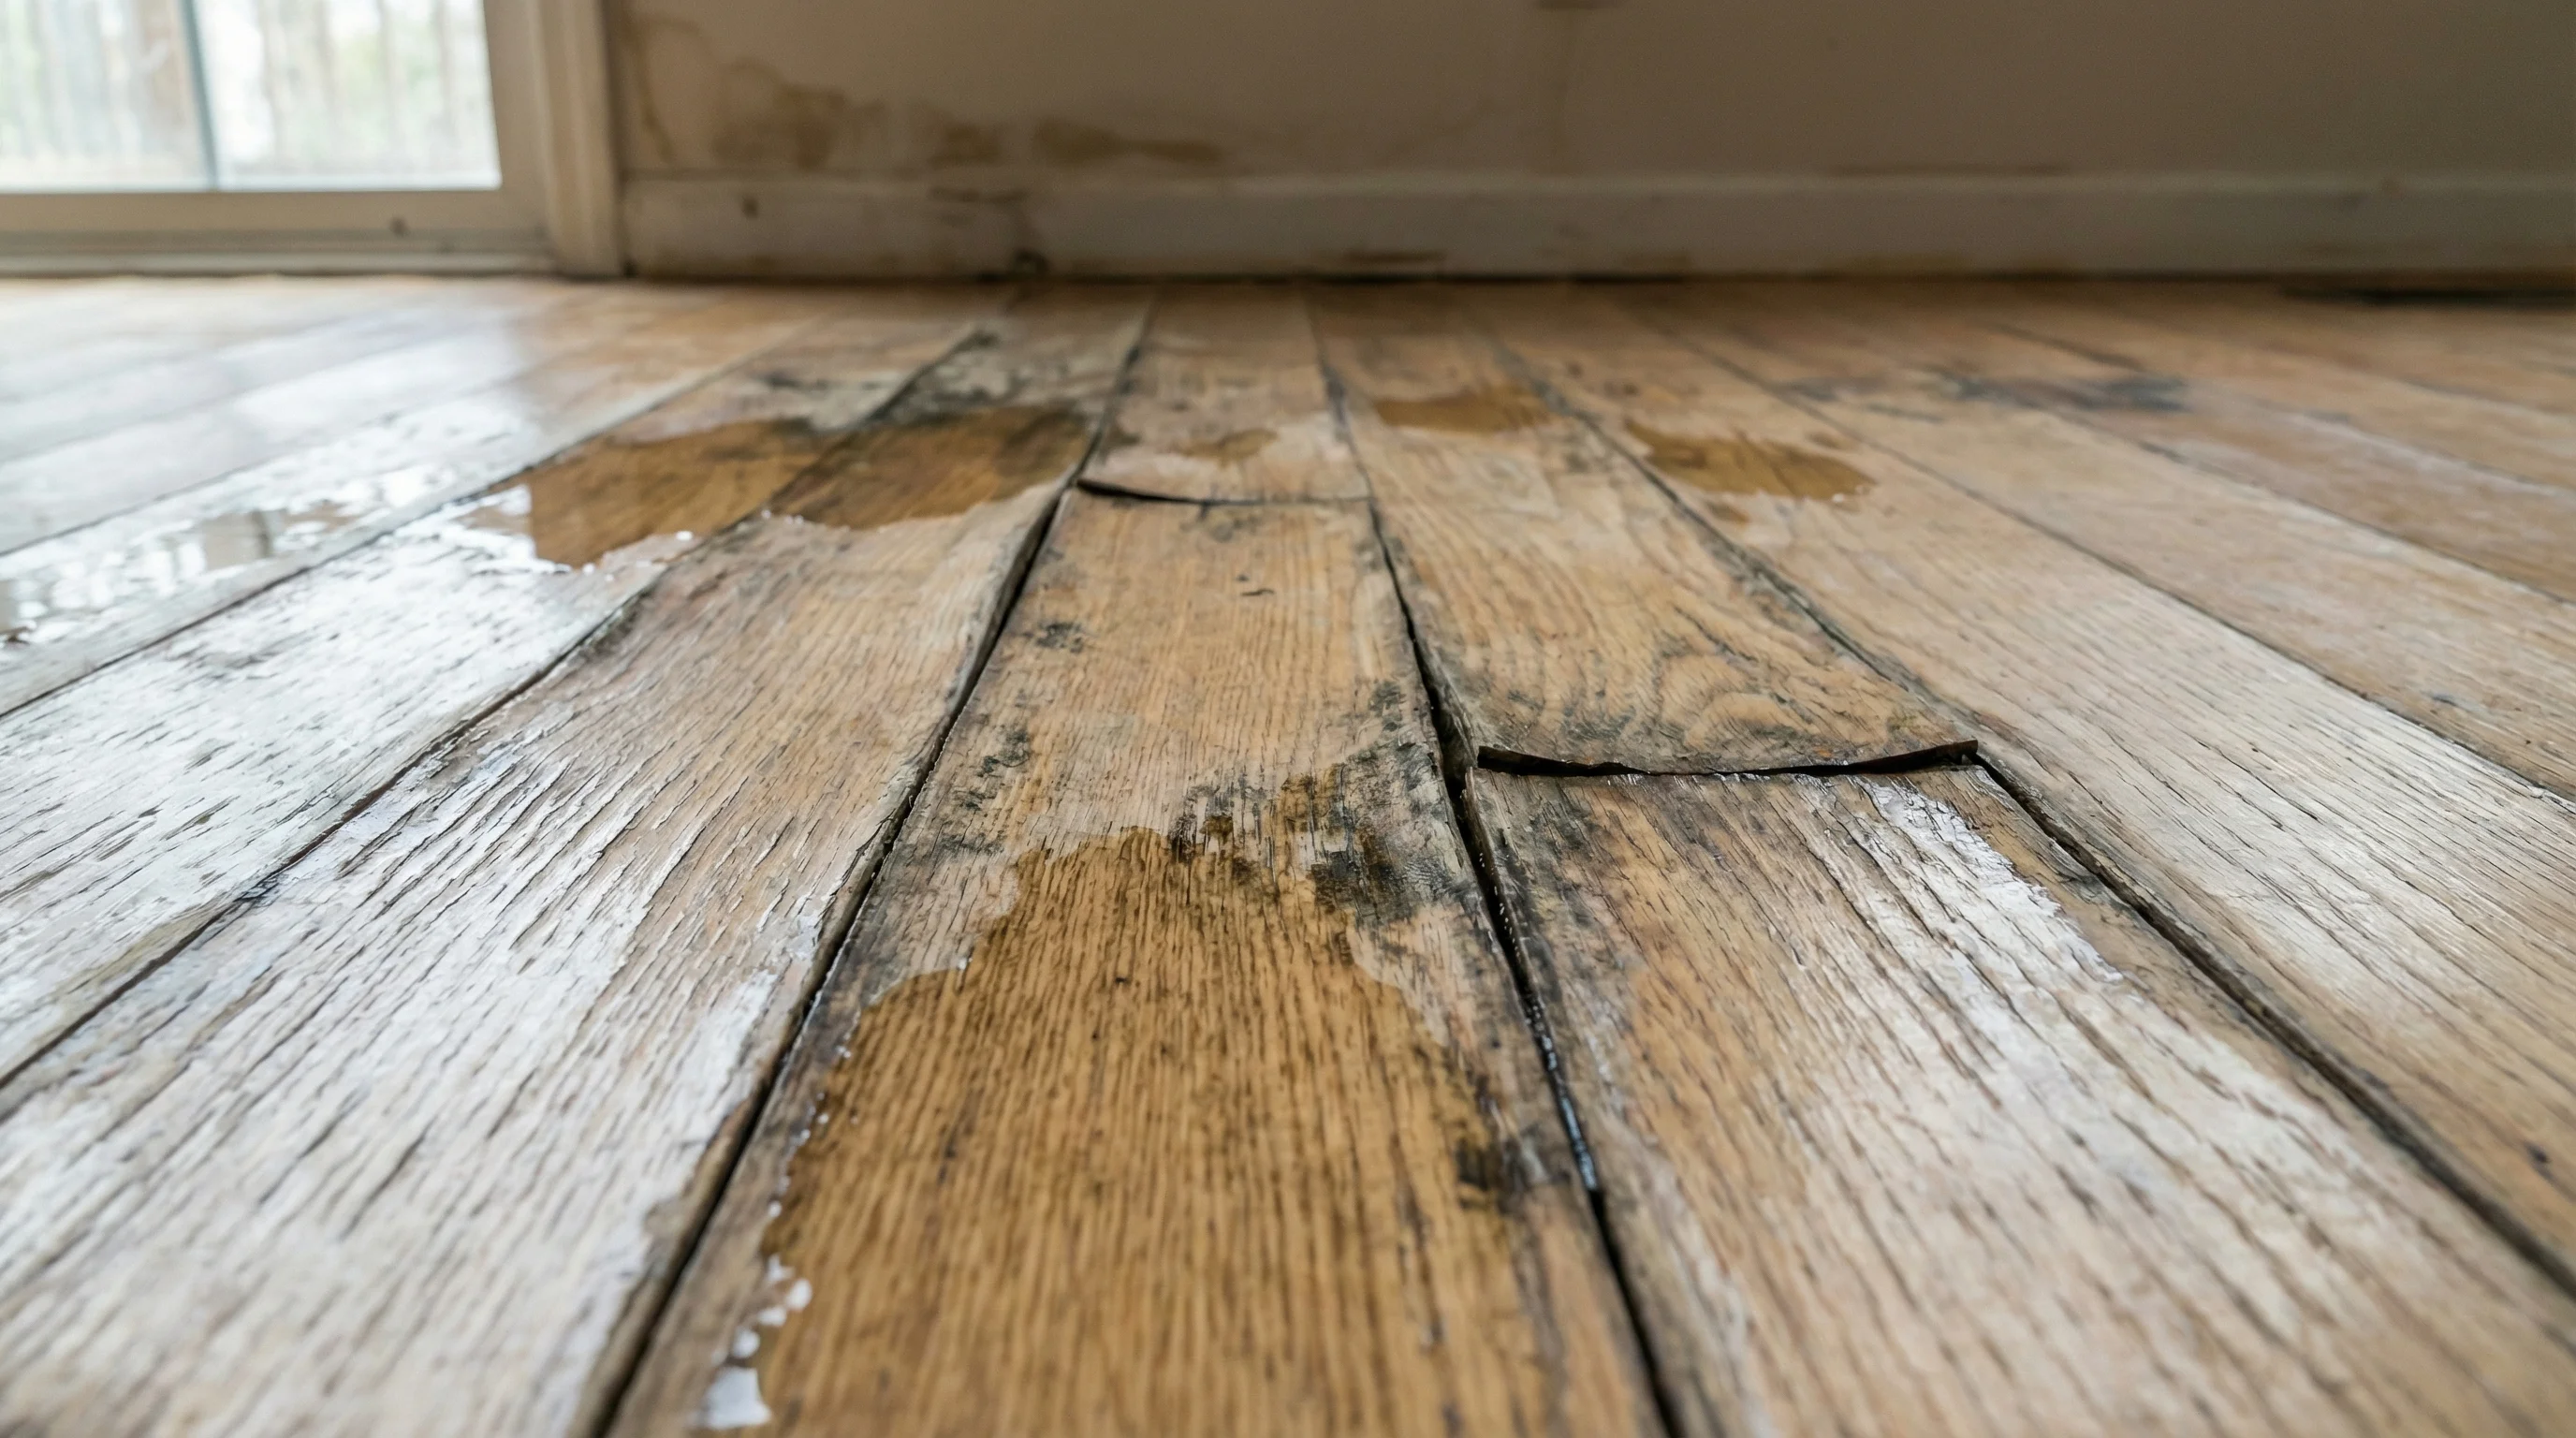
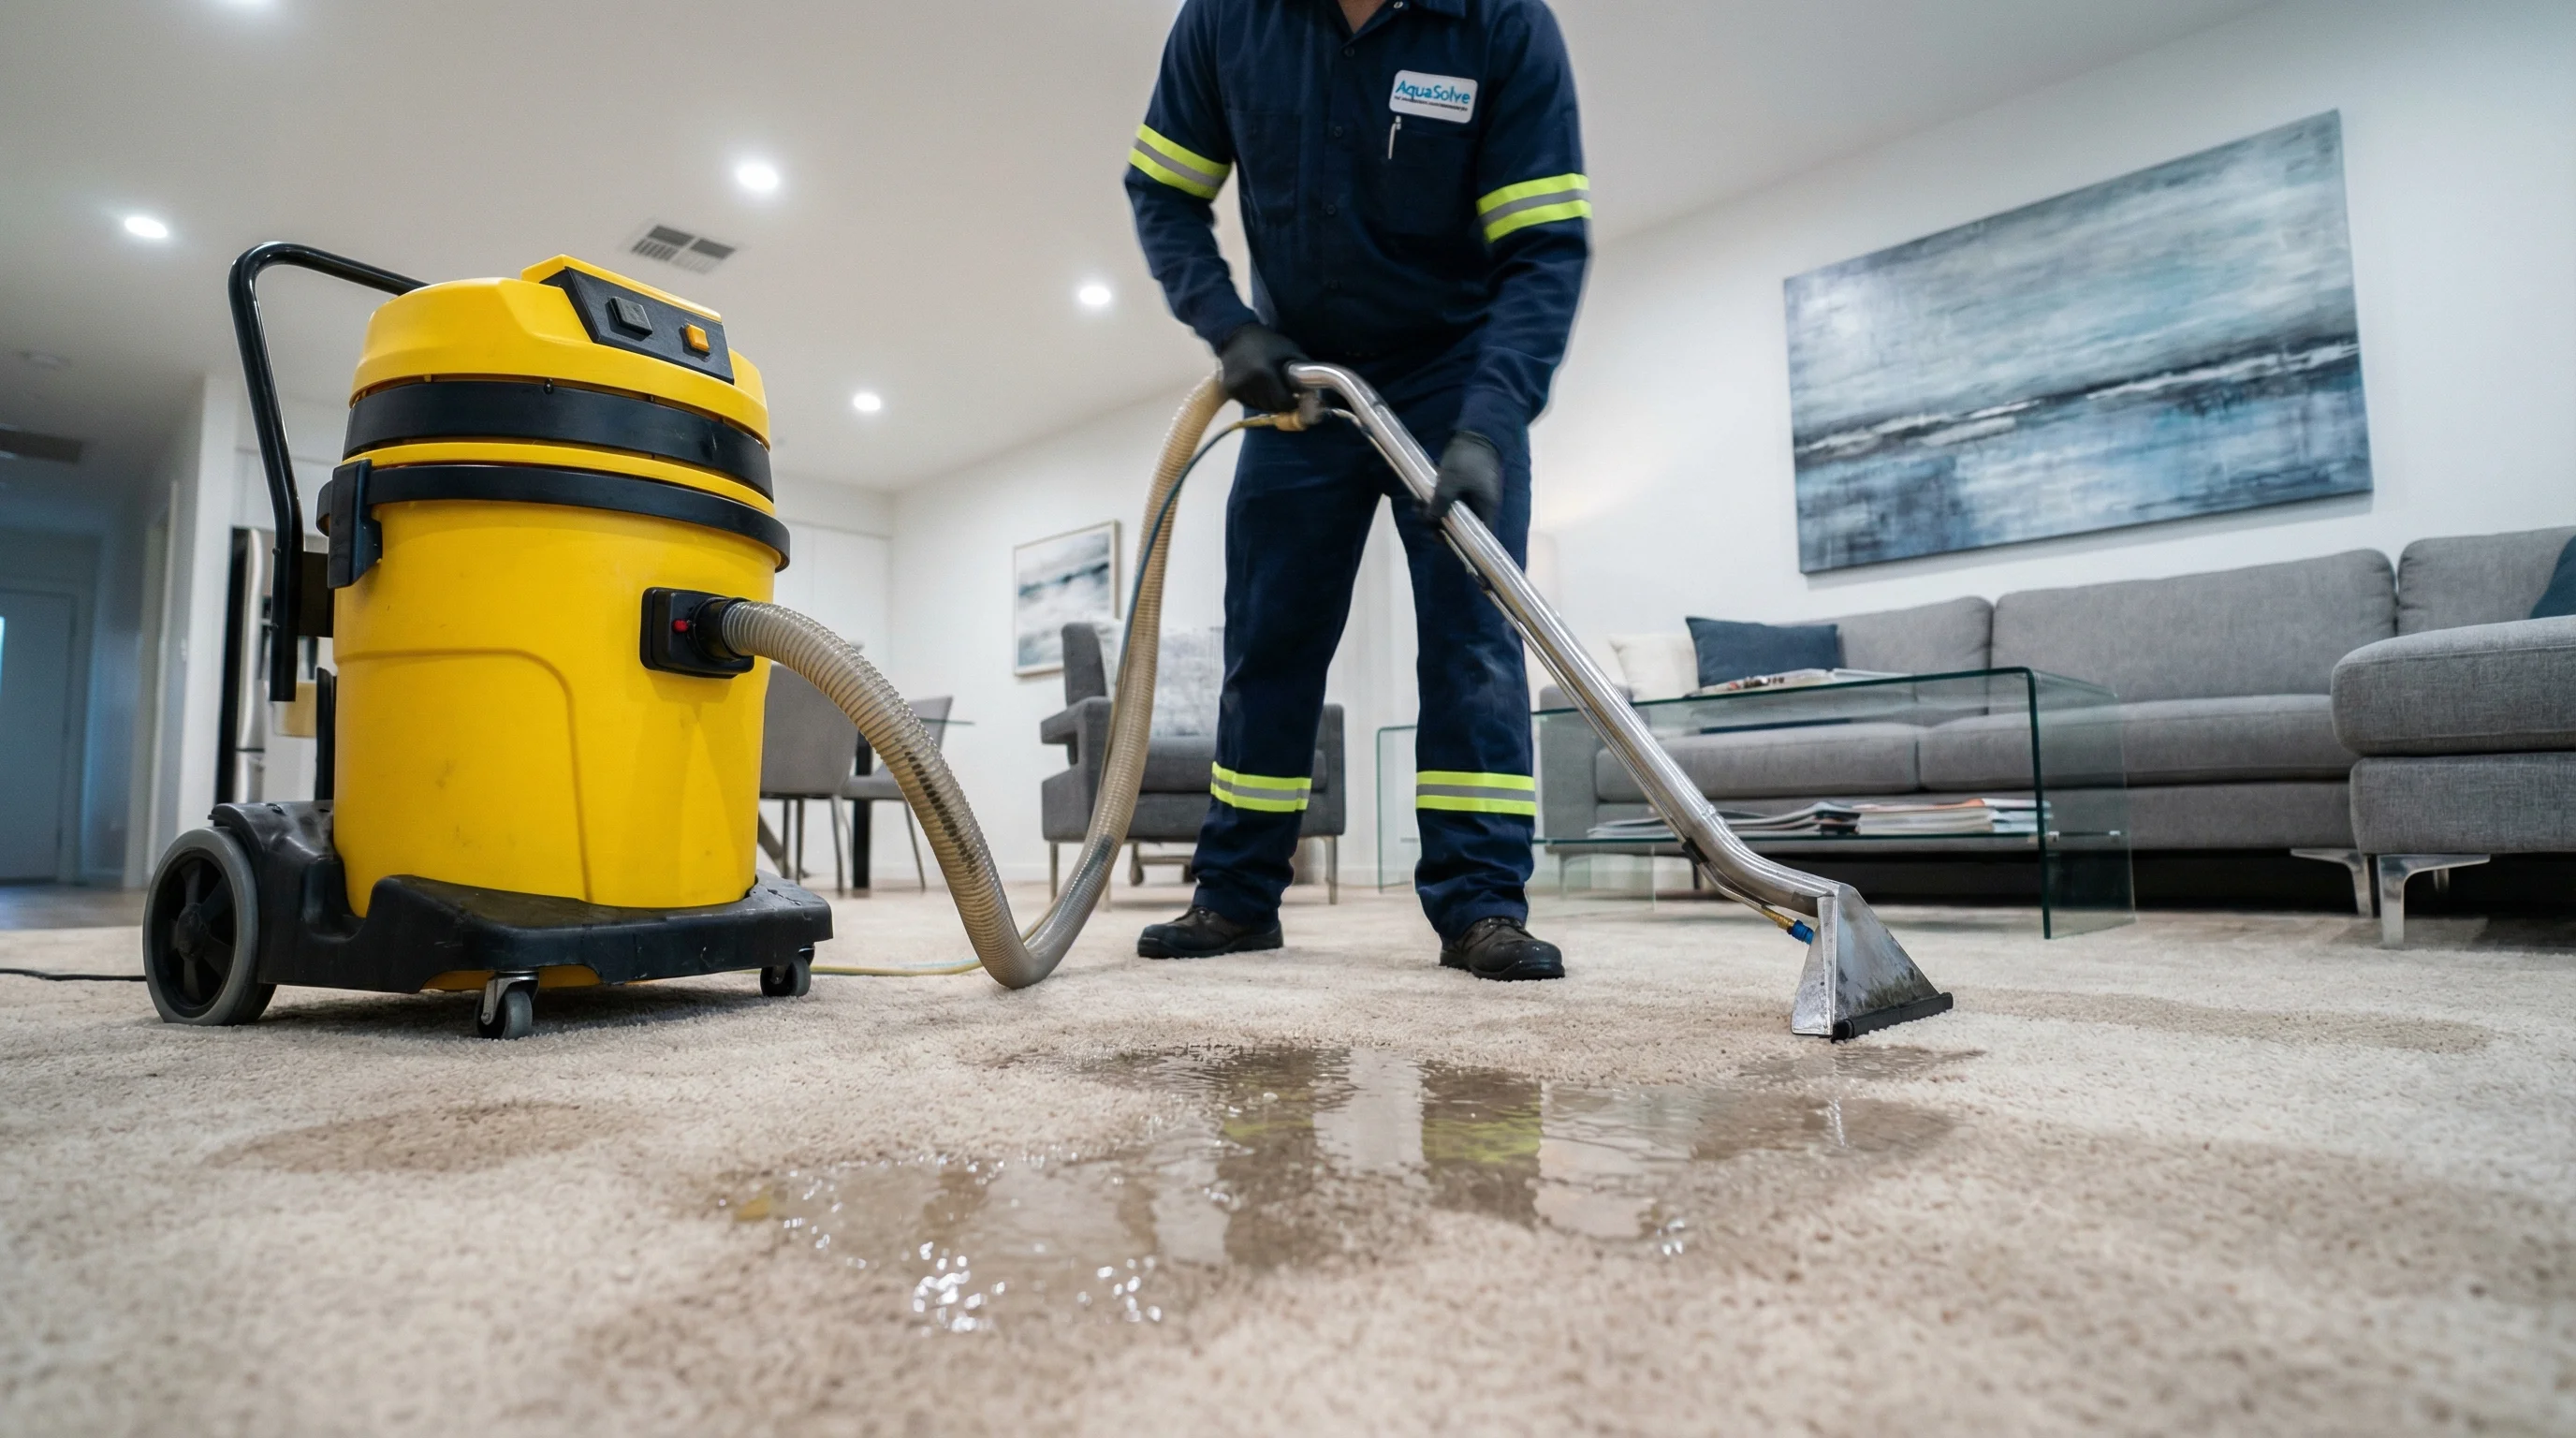
Water extraction after burst pipe

$500 - $2,000

Based on total affected square footage, water depth, and number of rooms requiring truck-mounted or portable extraction.

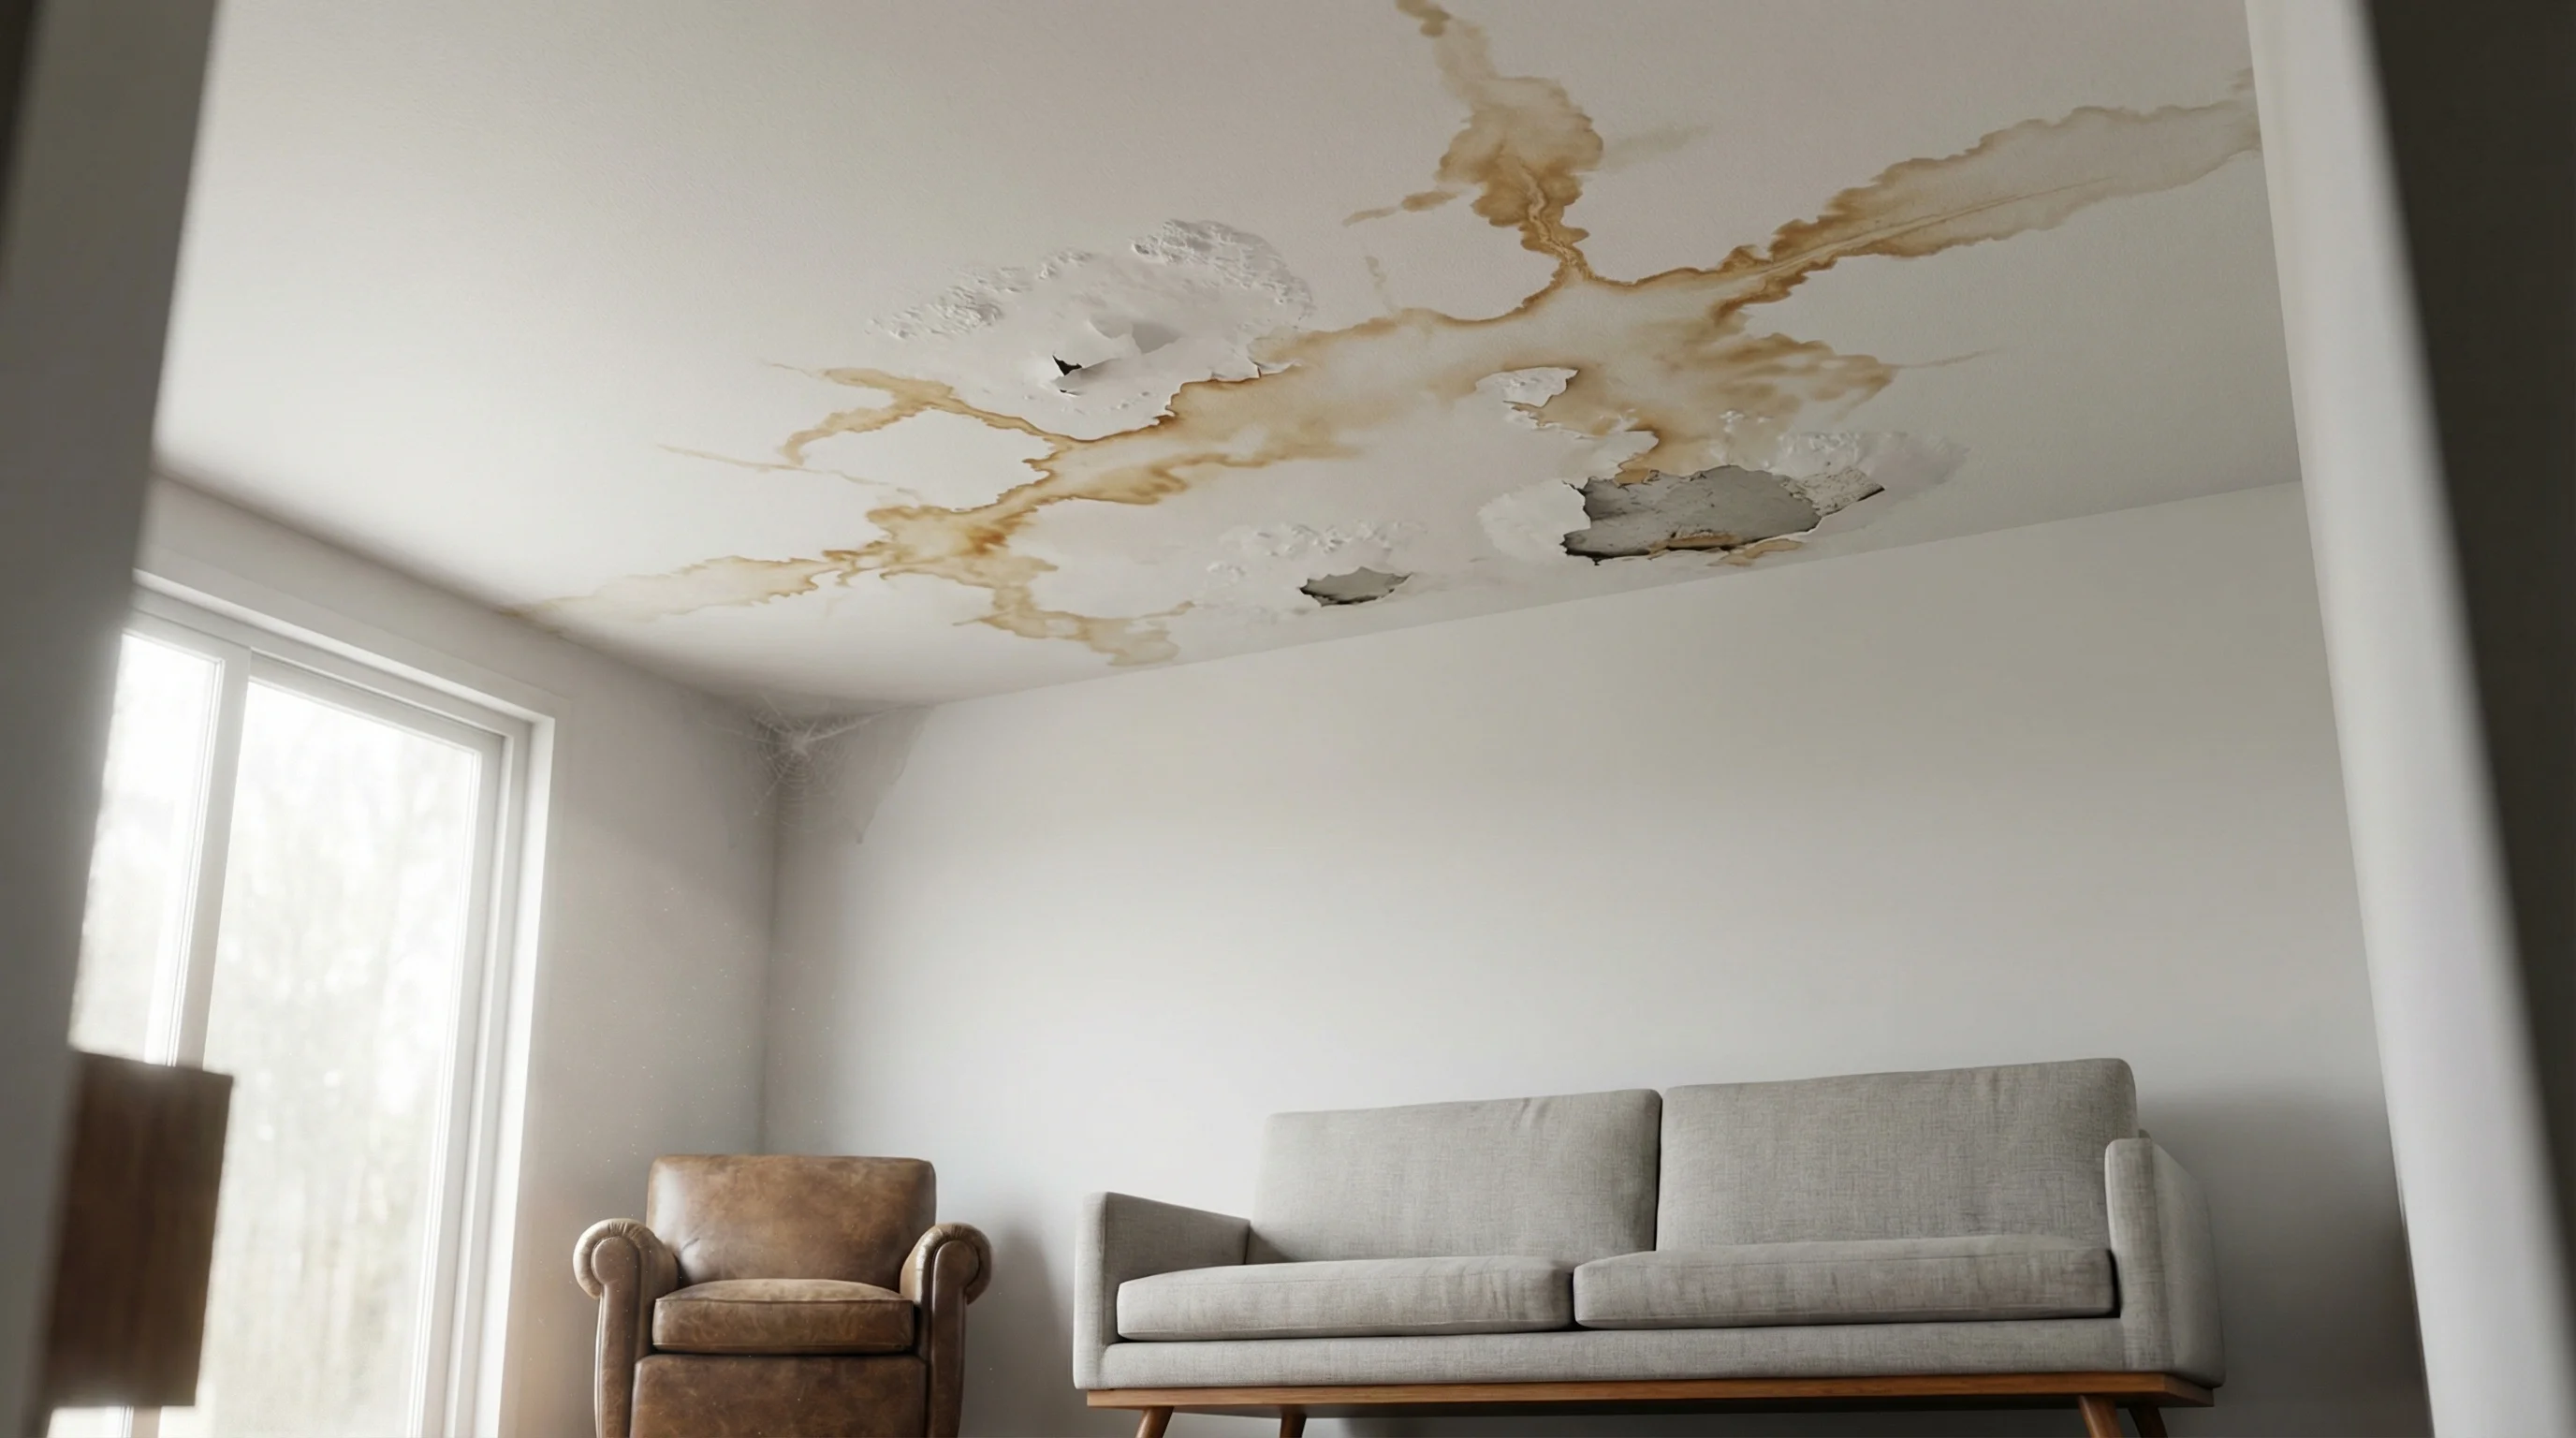
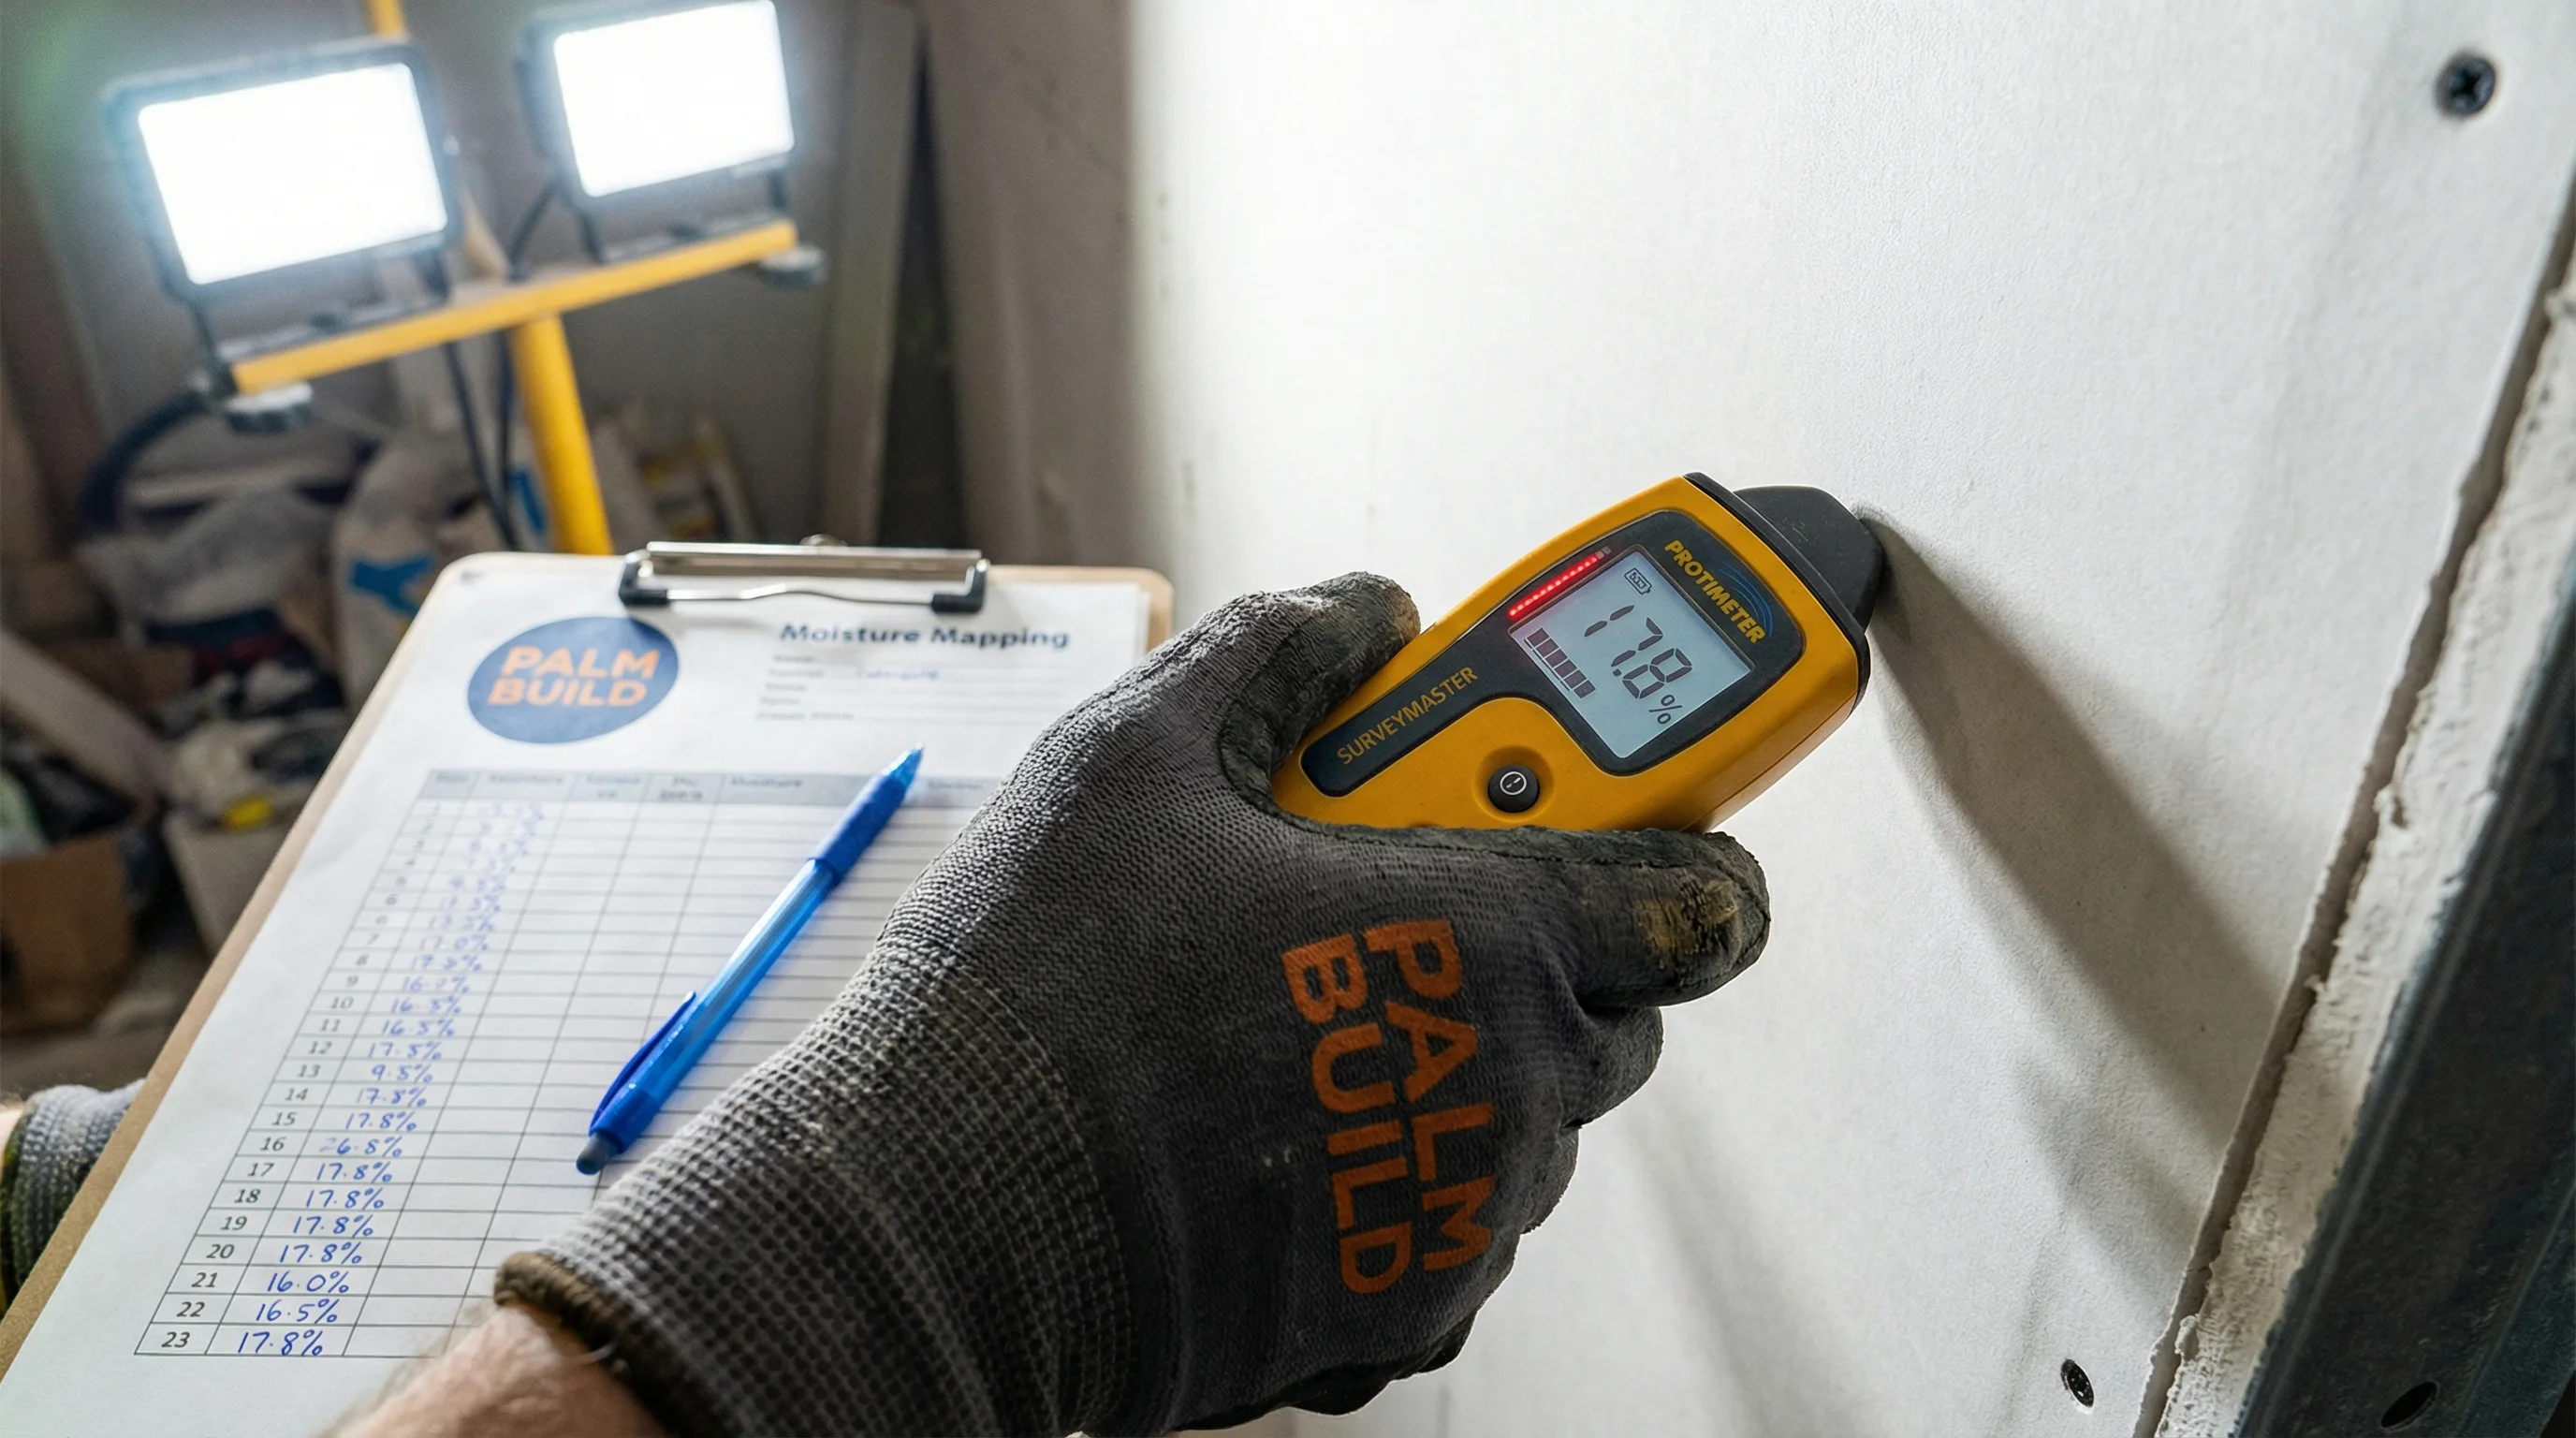
Drywall tear-out and drying

$3 - $7 / sq ft

Includes controlled demolition of saturated drywall, insulation removal, and monitored cavity drying with daily moisture documentation.

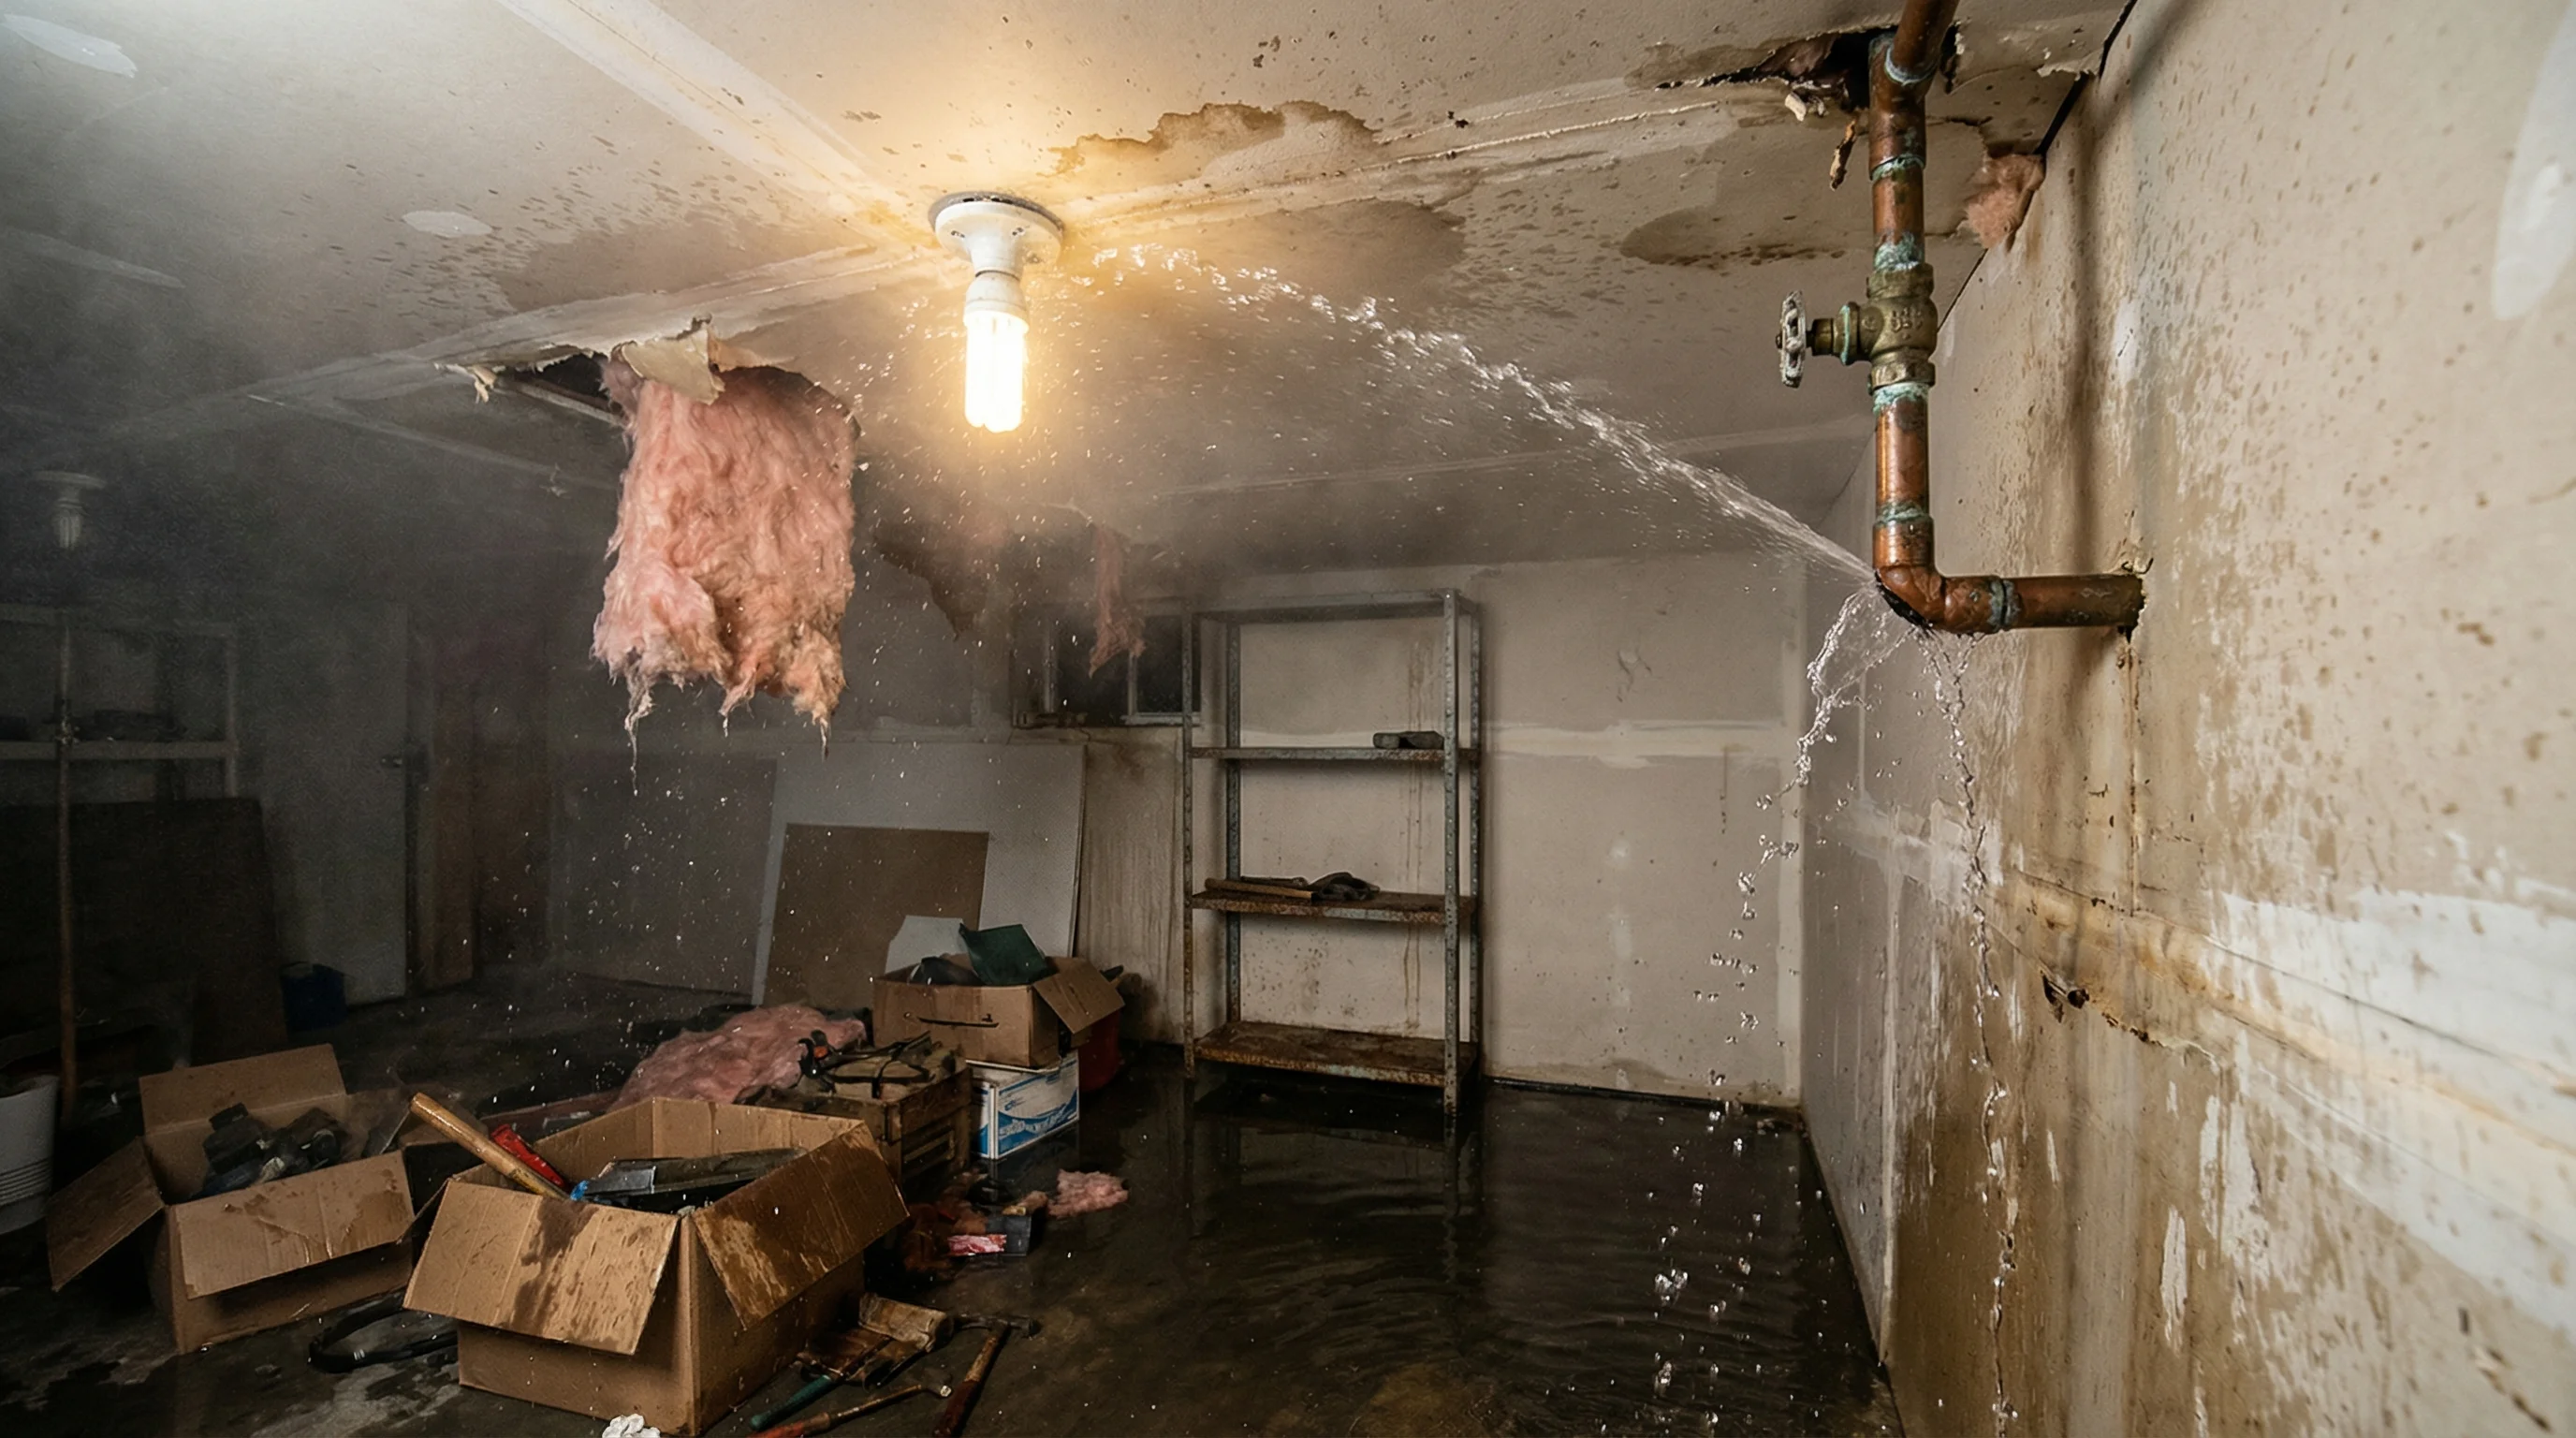
Ceiling drying (from above-floor breaks)

$400 - $1,200

Addresses overhead saturation from upper-level pipe failures, including insulation removal and directed airflow into ceiling cavities.

Full pipe repair (plumber coordination)

$200 - $1,000

Covers licensed plumber repair of the failed line segment. Cost varies by pipe material, access difficulty, and whether rerouting is required.

Regional operating notes

Charlotte / Metrolina

Winter cold snaps and rapid thaw cycles are a major burst-pipe driver, especially in attic and crawl-space lines that lack adequate insulation. Homes built before updated building codes often have supply lines routed through exterior walls or unheated garages, creating freeze vulnerability even during moderate cold events. Teams stage pre-winter for surge capacity during December through February when call volume increases significantly.

South Florida

Aging copper and polybutylene lines, municipal pressure fluctuations, and appliance connections create non-freeze burst and split-line events year-round. High ambient humidity complicates drying timelines, requiring larger dehumidification capacity and extended monitoring compared to drier climates. Condominiums and multi-unit buildings are particularly susceptible due to shared plumbing risers that can affect multiple units from a single line failure. For who pays when shared plumbing fails, see our HOA water damage responsibility guide.

South Carolina

Both cold-weather exposure and coastal storm conditions can trigger line failures in vulnerable structures across the region. Properties near the coast face additional corrosion risk from salt air, which degrades exposed fittings and accelerates pinhole leaks in copper lines. Crawl-space construction common throughout the Lowcountry means burst pipe water frequently saturates insulation and structural framing before it becomes visible inside the living space.

Common Questions

Frequently asked questions

What causes pipes to burst?

The most common cause is freeze-thaw cycling, where water inside the pipe expands as it freezes and creates pressure that ruptures the line. Other frequent causes include corrosion in aging copper or galvanized pipes, excessive municipal water pressure, water hammer from sudden valve closures, and mechanical damage from construction or shifting foundations. Polybutylene and older CPVC lines are particularly failure-prone due to material degradation over time.

Should I call a plumber or restoration company first?

If you can shut off the main water supply yourself, call a restoration company first. The immediate priority is water extraction and damage mitigation, not pipe repair. A restoration team can begin removing water and setting up drying equipment within hours, which limits secondary damage. The plumber handles the line repair itself, but that work can often wait until extraction is underway. Many restoration companies coordinate directly with licensed plumbers to streamline the process.

How much damage can a burst pipe cause?

A single burst supply line can release hundreds of gallons per hour, saturating drywall, insulation, flooring, and structural framing across multiple rooms and floors. In unoccupied homes, a burst pipe running for even a few hours can cause losses exceeding $20,000 in structural damage alone. Secondary damage from delayed response includes mold growth, subfloor delamination, and compromised electrical systems. The speed of mitigation is the single largest factor in controlling total loss cost.

Will insurance pay for pipe repair and water damage?

Most homeowner policies cover the resulting water damage from a sudden burst pipe but do not cover the cost of repairing or replacing the pipe itself, which is considered a maintenance item. Coverage depends on the cause of failure and whether the event was sudden and accidental versus gradual. Policies typically exclude damage from deferred maintenance, slow leaks, or lines that failed due to known neglect. Filing promptly and providing thorough documentation of the failure point and affected areas strengthens the claim.

How do I prevent pipes from freezing?

Insulate exposed pipes in attics, crawl spaces, garages, and exterior walls using foam pipe sleeves or heat tape rated for your climate zone. During cold snaps, keep the thermostat at 55 degrees or higher even when the property is unoccupied, and open cabinet doors beneath sinks on exterior walls to allow warm air circulation. For extended vacancies in winter, consider shutting off the main supply and draining the system. Know the location of your main shutoff valve so you can act quickly if a break does occur.

Burst pipe emergency?

Call now for immediate extraction and moisture stabilization.